

Hey everyone!! We cannot believe we are into Week 3!!
If you feel you are lagging behind, dont worry, you have time and you can catch up on the Nifty Thrifty Eco Bag CAL with GoKraftz Yarns at your own pace!! Dont forget to share your progress and tag us!!
We are excited to begin with week 3 instructions!! Our Designer Divya of @stringtierey has again put together a video tutorial for this week to help understand better.
But if you havent caught up on week 1 or week 2 yet, you can check out the instructions below and get onbaord with everyone.
You can find Week 1 Instructions HERE.
You can find Week 2 Instructions HERE.
Lets get on with it then!! Check out WEEK 3 of Instructions for the Nifty Thrifty Eco Bag!!

Lets look at some of the details once again before we begin.
KEY
ch: chain
sl st: slip stitch
sk: skip
sc: single crochet
st(s): stitch(es)
ch sp: chain space
dc: double crochet
yo: yarn over
sc2tog: single crochet 2 together
dc2tog: double crochet 2 together
dc5tog: double crochet 5 stitches together.
scdc2tog: single crochet double crochet 2 together (see special stitches)
dcsc2tog: double crochet single crochet 2 together (see special stitches)
MC: Main colour
CC: Contrast colour
MR: Magic Ring
WS: Wrong side
RS: Right side
SPECIAL STITCHES:
scdc2tog: single crochet double crochet 2 together
Insert hook into the next st (or ch sp), yo, pull up a loop, (2 loops on the hook), yo, insert hook into the next st, yo, pull up a loop, (4 loops on the hook) yo, pull through 2 loops, (3 loops on the hook) yo, pull through last 3 loops.
dcsc2tog: double crochet single crochet 2 together Yo, insert hook into the next st (or ch sp), yo, pull up a loop (3 loops on the hook), yo, pull through 2 loops, (2 loops on the hook), insert hook into the next st, yo, pull up a loop, (3 loops on the hook) yo, pull through last 3 loops.
NOTES:
- ch2/ch1 at the start of the Row, doesn’t count as a St.
- This bag is a constructed as a rectangular flat piece first and then the corners are worked to form the shape of the bag.
- Pattern is worked in flat rows by turning at the end of each row for the body, and in the round for the edging and shaping.
- The instructions are written in crochet shorthand, for eg. “sc 2” means single crochet in each of the next 2 stitches, “2sc” means make 2 single crochet in the same stitch.
- Stitch count is mentioned in Brackets as [#] at end of row.
- Blocking is a must for this project to achieve the desired look.
SCHEMATICS:
The bag is created by making a rectangle and then sinching the 4 corner points to create the shape. However instead or a normal rectangle we shall be starting from one corner and working our way u to create the remaining 3 corners of the rectangle.
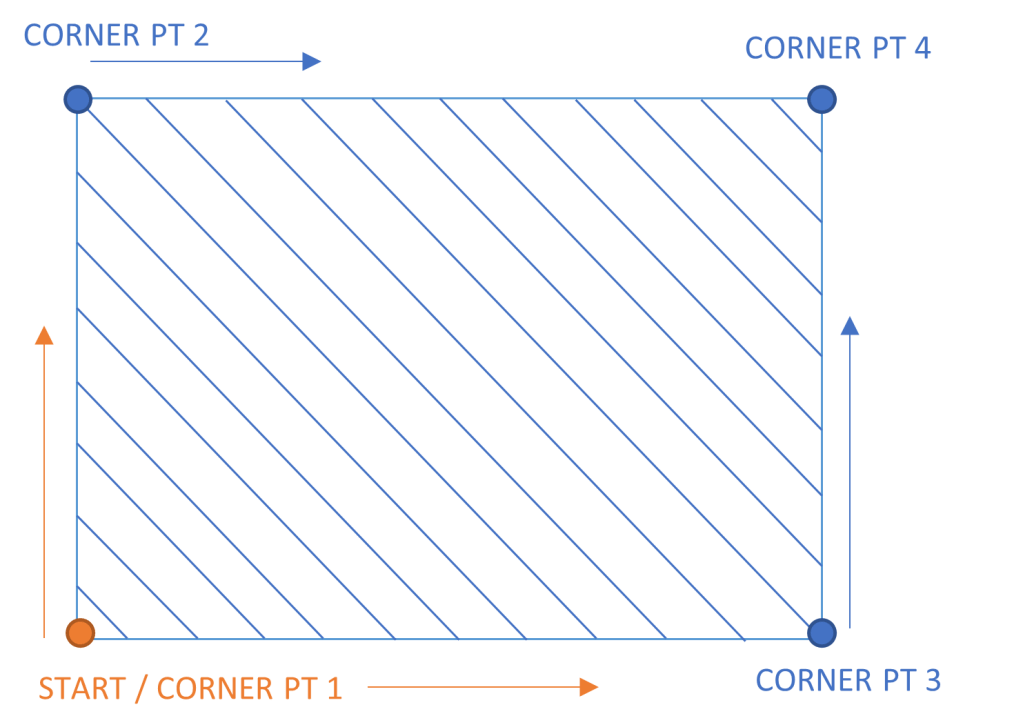
RECAP:
We ended week 1 at Row 48 for gohibulky yarn users and Row 60 for gobulky users, both in contrast colour. This end was the corner point 2 for both options.
We continued Week 2 to get to corner point 3, and started decreasing both sides.
PATTERN INSTRUCTIONS – WEEK 2:
For this week, we shall continue decreasing on both sides, till we reach the corner point 4 and block our rectangle to the right shape.
Since we completed Week 2 at 2 different row counts for both the different yarn options, the row numbers henceforth will be mentioned as ROW no. for gohibulky / no. for go bulky. Similarly for stitch counts at the end of the row. [gohibulky / gobulky]. UNLESS OTHERWISE MENTIONED.
You can check the Stitch Count Chart at the end for each row count.
The instructions remain the same for either yarn option you choose, unless specified.
ONLY Go bulky users, complete the following rows.
GO hibulky Users Scroll below.
With MC.
ROW 97 (WS): ch1, dc2tog, *ch1, sk1, dc. * Repeat * to * till last 2 st, ending with ch1, dc2tog in the last 2 sts. Turn. [73]
ROW 98 (RS): ch1, sc2tog in first st and ch sp, sc till the 3rd last st, sc2tog in the last 2 sts. Turn.[71]
ROW 99 (WS): Repeat ROW 97. [69]
ROW 100 (RS): Repeat ROW 98. [67]
ROW 101 (WS): Repeat ROW 97. [65]
ROW 102 (RS): Repeat ROW 98. [63]
Change to CC, Cut MC.
ROW 103 (WS): ch1, sc2tog, *ch3, sk1, sc. * Repeat * to * till the last 2 sts ending in ch3, sc2tog in the last 2 sts. Turn. [31 sc, 30 ch3 sp]
ROW 104 (RS): ch1, dcsc2tog in sc and ch3sp, *dc in sc, sc in ch3 sp* Repeat * to * till the last ch3 sp, scdc2tog in the ch3 sp and the last st. Turn. [59]
ROW 105 (WS): Repeat ROW 103. [29 sc, 28 ch3 sp]
ROW 106 (RS): Repeat ROW 104. [55]
ROW 107 (WS): Repeat ROW 103. [27 sc, 26 ch3 sp]
ROW 108 (RS): Repeat ROW 104. [51]
GO hibulky Users start week 3 here. Gobulky users continue.
So for both options now we will have different row numbers but same stitch count.
Change to MC, Cut CC.
ROW 85/109 (WS): ch1, dc2tog, *ch1, sk1, dc. * Repeat * to * till last 2 st, ending with ch1, dc2tog in the last 2 sts. Turn. [49]
ROW 86/110 (RS): ch1, sc2tog in first st and ch sp, sc till the 3rd last st, sc2tog in the last 2 sts. Turn.[47]
ROW 87/111 (WS): Repeat ROW 85/109. [45]
ROW 88/112 (RS): Repeat ROW 86/110. [43]
ROW 89/113 (WS): Repeat ROW 85/109. [41]
ROW 90/114 (RS): Repeat ROW 86/110. [39]
Change to CC, Cut MC.
ROW 91/115 (WS): ch1, sc2tog, *ch3, sk1, sc. * Repeat * to * till the last 2 sts ending in ch3, sc2tog in the last 2 sts. Turn. [19 sc, 18 ch3 sp]
ROW 92/116 (RS): ch1, dcsc2tog in sc and ch3sp, *dc in sc, sc in ch3 sp* Repeat * to * till the last ch3 sp, scdc2tog in the ch3 sp and the last st. Turn. [35]
ROW 93/117 (WS): Repeat ROW 91/115. [17 sc, 16 ch3 sp]
ROW 94/118 (RS): Repeat ROW 92/116. [31]
ROW 95/119 (WS): Repeat ROW 91/115. [15 sc, 14 ch3 sp]
ROW 96/120 (RS): Repeat ROW 92/116. [27]
Change to MC, Cut CC.
ROW 97/121 (WS) – ROW 102/126 (RS): Repeat ROW 85/109 – ROW 90/114.
Change to CC, Cut MC.
We will now repeat only 5 rows till the corner point and make the last row differently to end the rectangle.
ROW 103/127 (WS) – ROW 107/131 (WS): Repeat ROW 91/115 – ROW 95/119.
ROW 108/132 (RS): ch2, dc5tog, ch1. [5]
Cut CC. Fasten off.
Now your Rectangle is complete! Head over to blocking section.
STITCH COUNT TABLE:
Gobulky Users start Week 3 here.
| ROW NO. | STITCH COUNT | ROW NO. | STITCH COUNT | |
| ROW 97 (WS) | 73 | ROW 103 (WS) | 31 sc, 30 ch3 sp | |
| ROW 98 (RS) | 71 | ROW 104 (RS) | 59 | |
| ROW 99 (WS) | 69 | ROW 105 (WS) | 29 sc, 28 ch3 sp | |
| ROW 100 (RS) | 67 | ROW 106 (RS) | 55 | |
| ROW 101 (WS) | 65 | ROW 107 (WS) | 27 sc, 26 ch3 sp | |
| ROW 102 (RS) | 63 | ROW 108 (RS) | 51 |
Gohibulky users start week 3 here. Go bulky Users continue.
| ROW NO. | STITCH COUNT | ROW NO. | STITCH COUNT | |
| ROW 85/109 (WS) | 49 | ROW 91/115 (WS) | 19 sc, 18 ch3 sp | |
| ROW 86/110 (RS) | 47 | ROW 92/116 (RS) | 35 | |
| ROW 87/111 (WS) | 45 | ROW 93/117 (WS) | 17 sc, 16 ch3 sp | |
| ROW 88/112 (RS) | 43 | ROW 94/118 (RS) | 31 | |
| ROW 89/113 (WS) | 41 | ROW 95/119 (WS) | 15 sc, 14 ch3 sp | |
| ROW 90/114 (RS) | 39 | ROW 96/120 (RS) | 27 |
| ROW NO. | STITCH COUNT | ROW NO. | STITCH COUNT | |
| ROW 97/121 (WS) | 25 | ROW 103/127 (WS) | 7 sc, 6 ch3 sp | |
| ROW 98/122 (RS) | 23 | ROW 104/128 (RS) | 11 | |
| ROW 99/123 (WS) | 21 | ROW 105/129 (WS) | 5 sc, 4 ch3 sp | |
| ROW 100/124 (RS) | 19 | ROW 106/130 (RS) | 7 | |
| ROW 101/125 (WS) | 17 | ROW 107/131 (WS) | 3 sc, 2 ch3 sp | |
| ROW 102/126 (RS) | 15 | ROW 108/132 (RS) | 5 |
To help you understand better, Divya has created a tutorial video that is perfect for beginners:
Blocking:
Your rectangle is complete and if you just lay it out flat.. well… it doesnt look much like a rectangle is it?
The method of blocking will help reshape the piece to a proper rectangle and open up the mesh design. So lets block!!
For this project we shall do the wet blocking method. Wet Blocking essentially means soaking the project in water and then drying it flat to the required shaping.
Now for drying flat, usually blocking mats and pins are used. But if you dont have blocking mats, dont fuss! You can always use other alternatives like yoga mat, baby floor mats, or dry towel on mattress. You can use any kind of pins – the soft board pins, embroidery pins or T pins.
Follow the steps below for wet blocking.
- Soak the project in water with a mild fabric conditioner (eeasy, comfort, wool wash – anyof these will do) for about half hour.
- Rinse out the water, by gently pressing the piece with your hands. DO NOT WRING TO REMOVE WATER.
- Take a dry towel and roll the piece into the towel. Press the towel hard (you can put weights on it or just stamp it out with your legs) so it absorbs almost all the water.
- Now take the semi wet piece to the blocking mat/ yoga mat/ dry towel on mattress and start stretching and pinning down the corners and sides, starting from one end of the rectangle to the other.
- Leave it to dry.
Divya has made a you tube video for the blocking instructions too:
That is it for Week 3!! in case of any queries reach out to us via email or comment below this post or dm us on instagram. you can also address your queries directly with our designer Divya @stringtierey on instagram.
We would love to see your progress, so dont forget to tag us, gokratfz and stringtierey on instagram and use hashtags #goiyccal2022 #goiycecocal #niftythriftyecocal #iyccal2022 #goiyccal #niftythriftyecobag

I’ve completed week 3 finally. just got to do the blocking now. looking forward to completing the bag
LikeLike