Hello everyone!! Continuing with our Featured Designer series, we have a very talented designer to showcase today!
For everyone new here…All along the month of August, India yarn circle is giving an opportunity to knit and crochet designers to feature a design on our blog.
Each week we are going to promote an Indian Designer and one of their famous patterns with all the details about their journey and love for crafts, to the detail of the design and thought process.
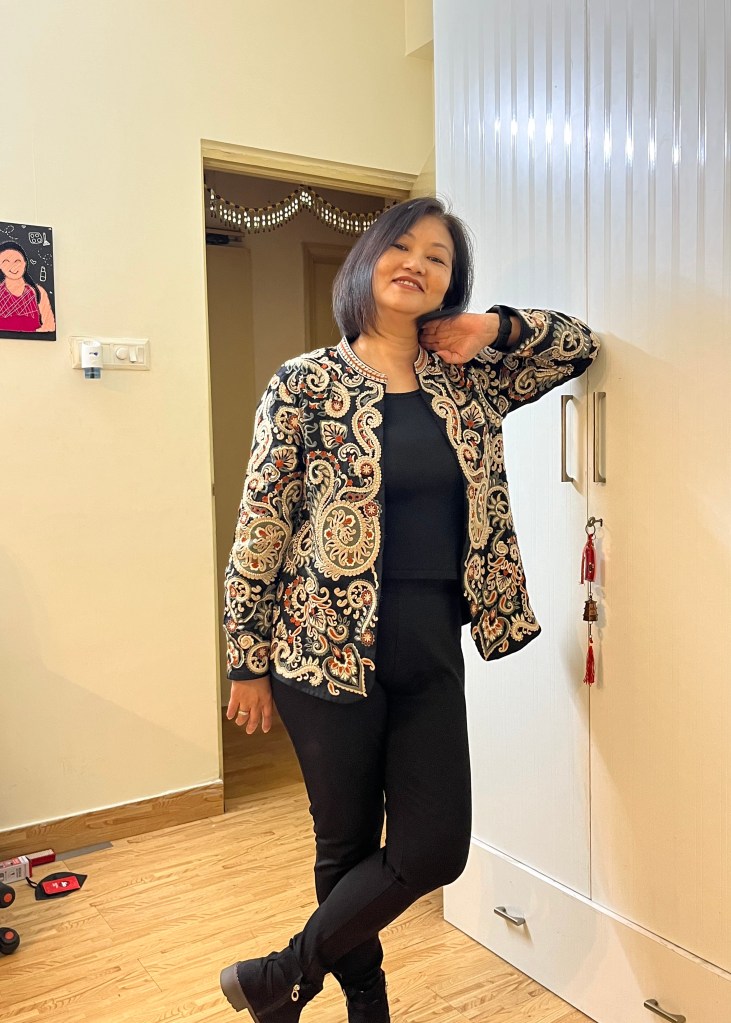
Today we are featuring Rosiland Bakshi of M&H Crochet Creations
A quick Intro about Rosy – Hi everyone this is Rosalind Bakshi, also known as Rosy.
I enjoy crafting. Quilling, embroidery , paper craft etc. you name it , I have tried my hands at it.
I have only recently learnt knitting and crochet by watching YouTube videos.
The support and encouragement given by my family made me turn into an entrepreneur. I started my small business M&H Crochet Creations, named after my kids, Mayank and Hina.
I am enamored by the colours I see around me. Whenever I see colour work in crochet, I am eager to start one myself.
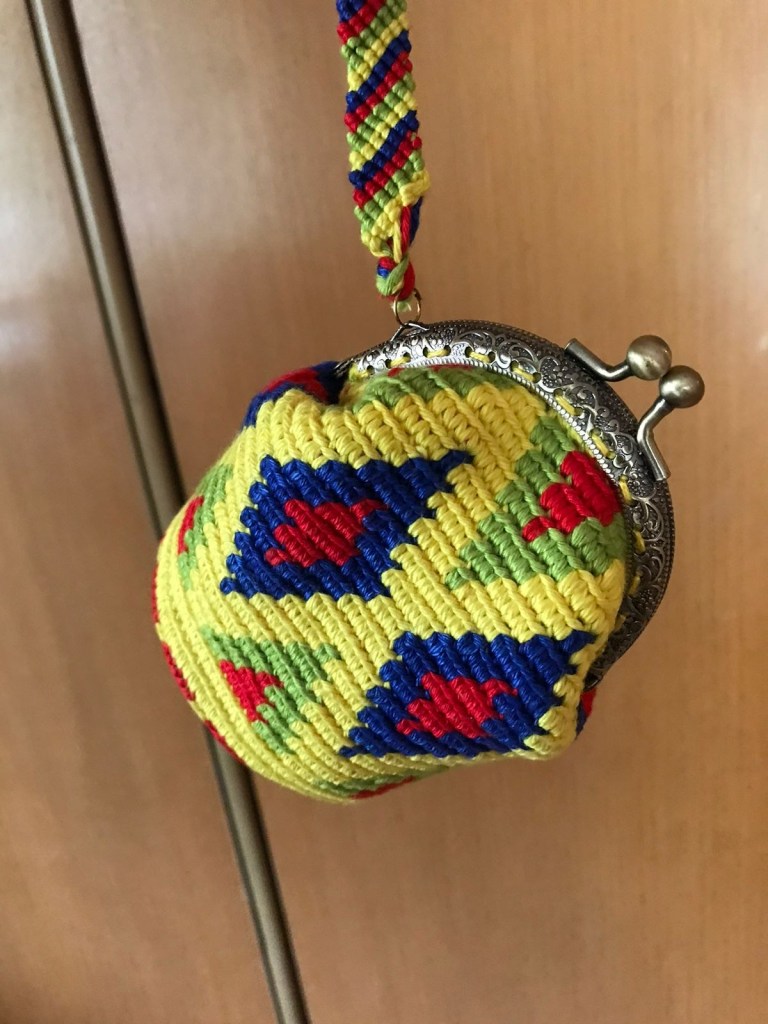
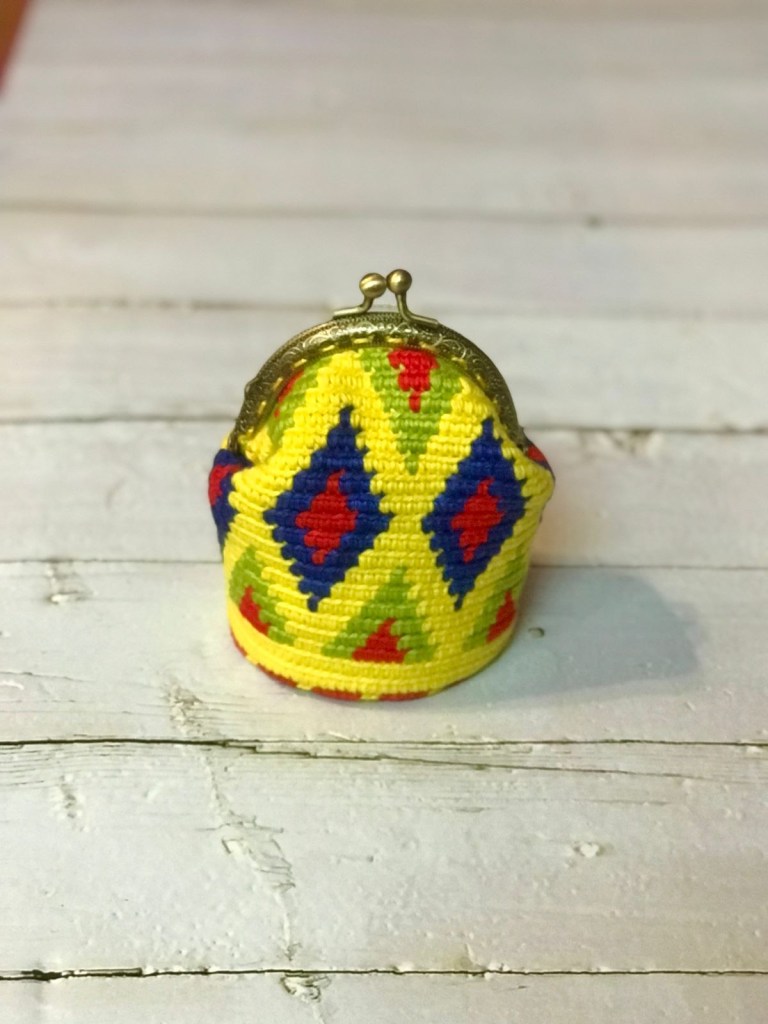
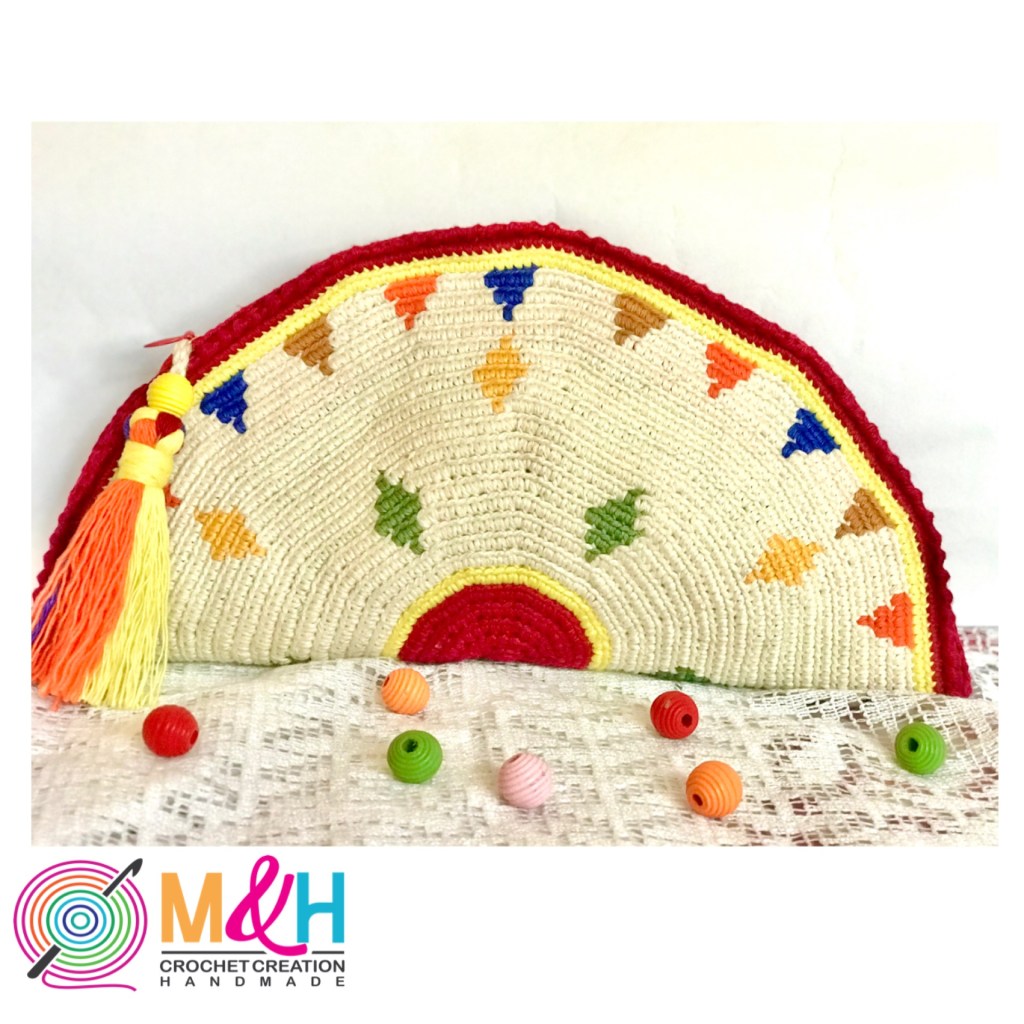
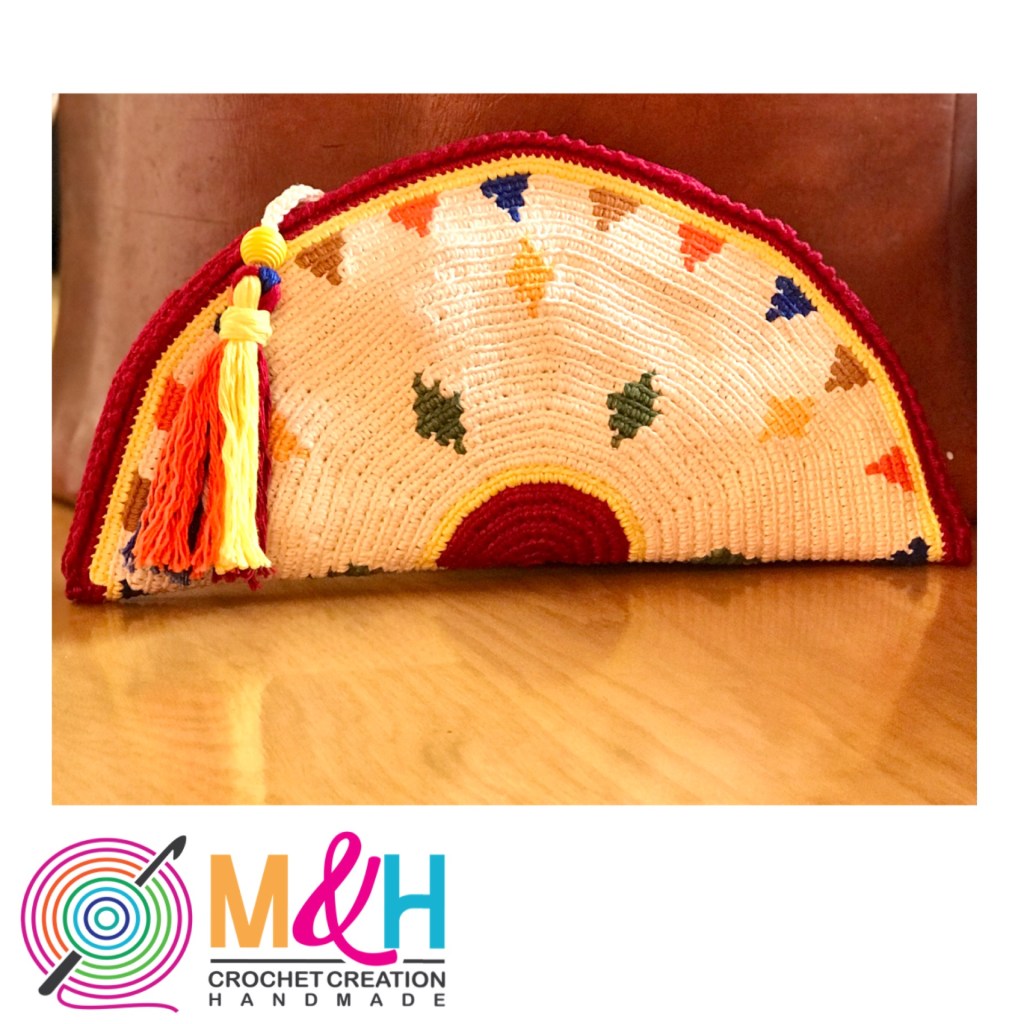
I was fascinated by the Mochila bags I saw on the internet and have always wanted to make them. Marion Verloop’s tutorials helped me a lot that I finally became comfortable to design my very own coin purse.
I am happy to be presenting this pattern for the India Yarn Circle community. I am nowhere near being an expert but I should like to share my knowledge with you all!
Hello Everyone!!! And Welcome Back to a super new, interesting and a quick CAL!!
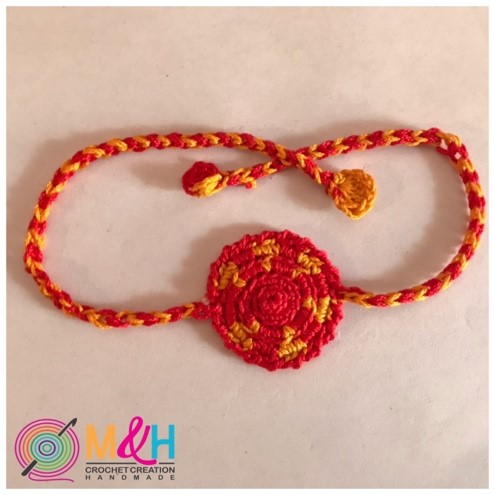
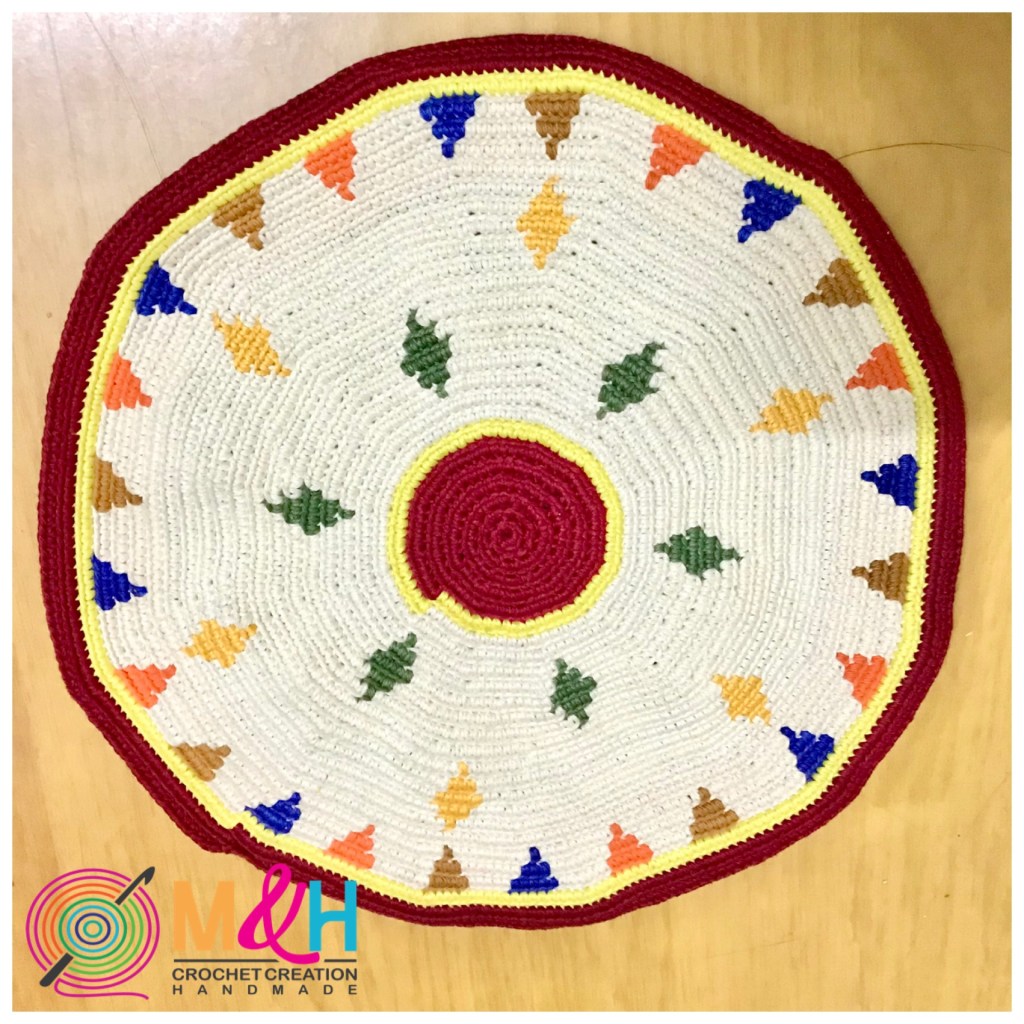
Since the festival season is upcoming, our very own member, Rosy of @mnhcrochetcreation has designed some beautiful Rakhis using the Mochila Techique in crochet!
These Rakhis are stunning and so unique, they would definitely steal the show and get you all the praises for making it yourself!
@mnhcrochetcreation
So why wait!! Lets Dive into it!!
Level
Easy/ Beginner
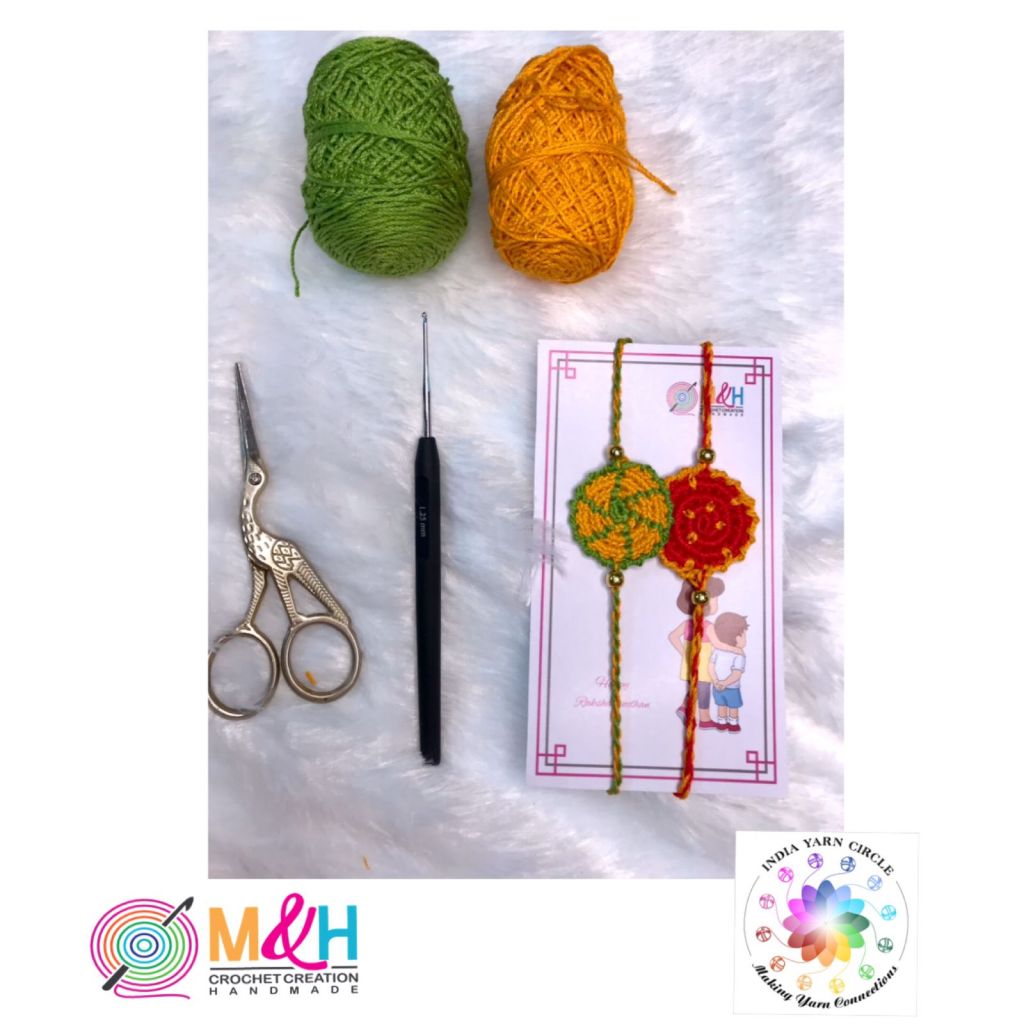
Supplies
Hook size 1mm Mercerized Cotton Yarn. (I am using Anchor 4054) You can also use Anchor pearl thread, Kotton 3ply or any doily thread. Scissor Beads optional
Colour Index
Colour A –
Colour B –
Note: The above colour index is just an example. Please use any colour combination of your choice.
Abbreviations
A = Red
B = Yellow
1A = crochet stitch with color A
A inc = increase (2 single crochet in the next single crochet)
AB inc = increase with 2 colors (one stitch in color A and one stitch in color B)
* * = repeat what is between
* * (2x) = repeat 2 times what is between
* * [12]= total number of stitches at the end of the round
Pick up different colour = before the next colour change, do a normal yarn over with current yarn and then second yarn over with new colour.
PATTERN TYPE 1
@mnhcrochetcreation
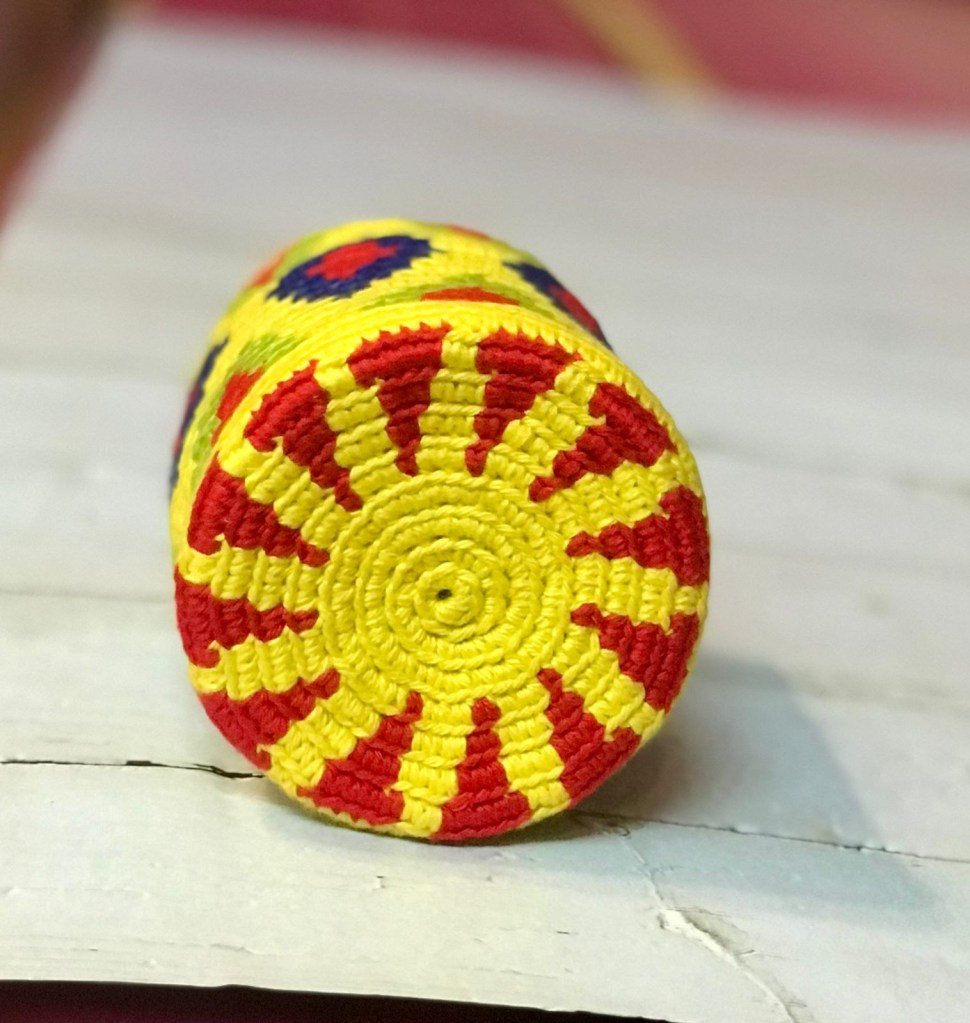
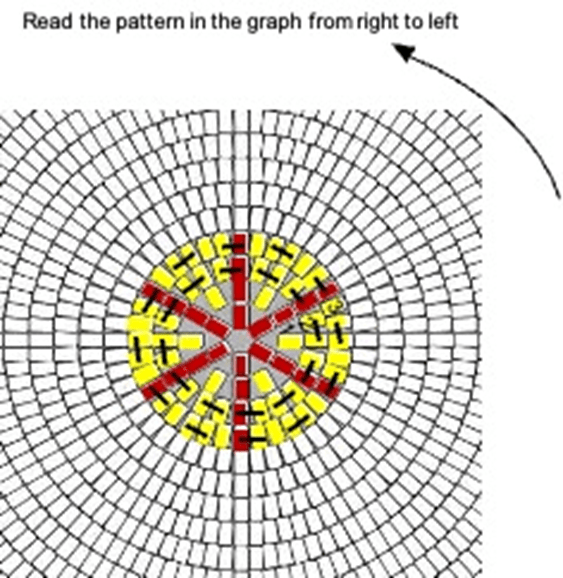
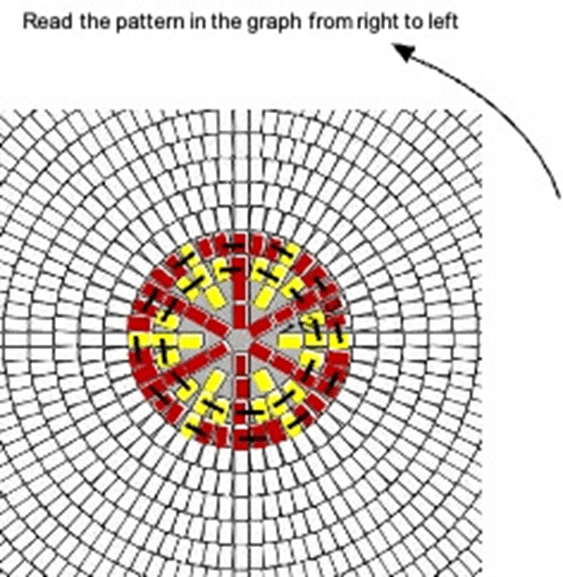
CHART 1:
In this chart, red blocks are yarn colour A and yellow ones colour B
Black colour dash across two blocks indicates increase in stitches. 6 stitches in the magic circle is not counted as a Row.
@mnhcrochetcreation
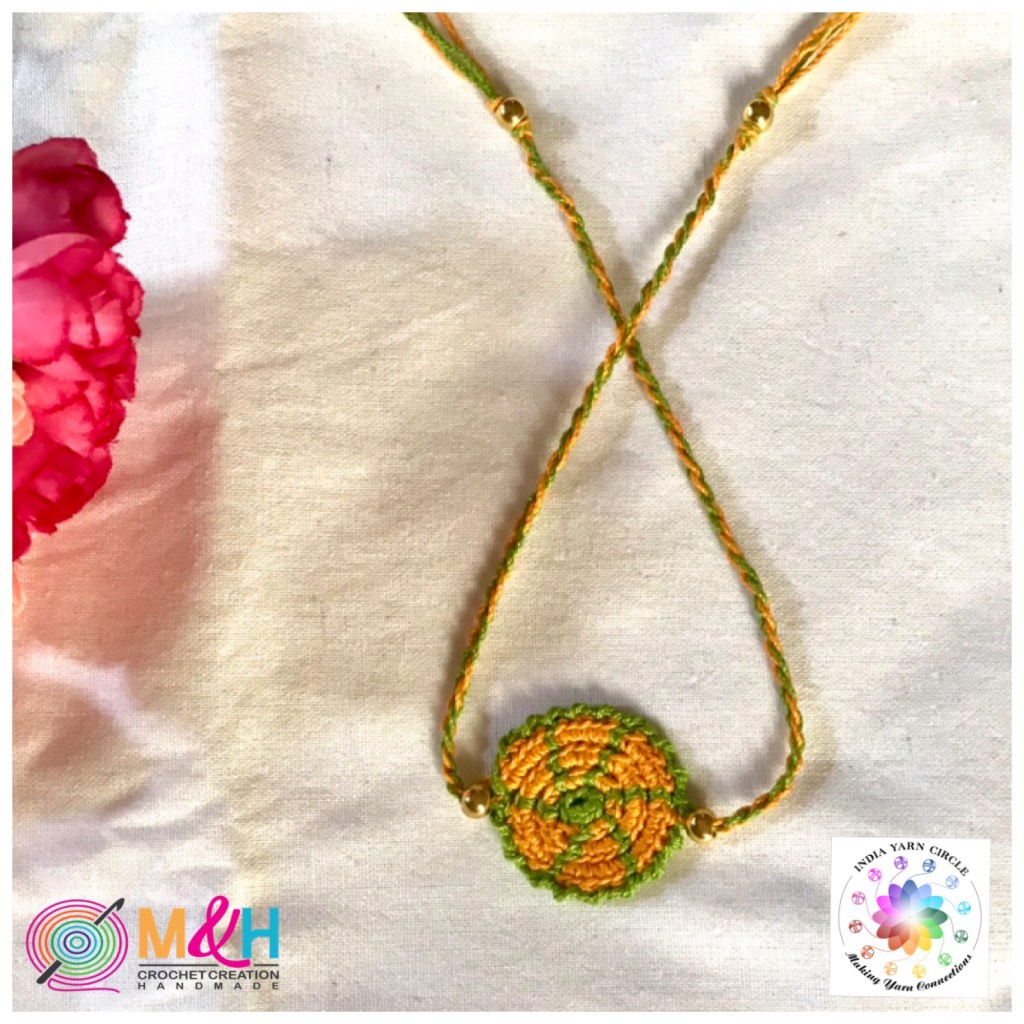
RAKHI PATTERN 1
•Please note that from Row 1 onwards, you will work each stitch in the back loop.
•Don’t forget to keep pulling the additional yarns that you carry to make your work look neat and round.
Make Magic Circle and make 6sc with colour A
Row 1: *AB inc* (Repeat * to * 6 times) (12) Add colour B ( Take 4 strands measuring 15 inches in colour A and 1 strand of colour B and add right after you finish row 1)
Row 2:*AB inc, B inc * (Repeat * to * 6 times) (24)
Row 3:* AB inc, 1B, B inc, 1B * (Repeat * to * 6 times) [36]
slip stitch and cut off the yarns which was added.
With Yarn A make crab stitch all around and cast off. You can add beads instead of doing crab stitch.
Take 4 strands measuring 15 inches. Take 2 strands and tie it at one end where you want to make the dhaga (thread). Now twist two strands from both sides and release till it looks like a rope. Tie at the end and add one inch tassel with same yarn. You can make this dhaga with two colours also.
PATTERN TYPE 2
@mnhcrochetcreation
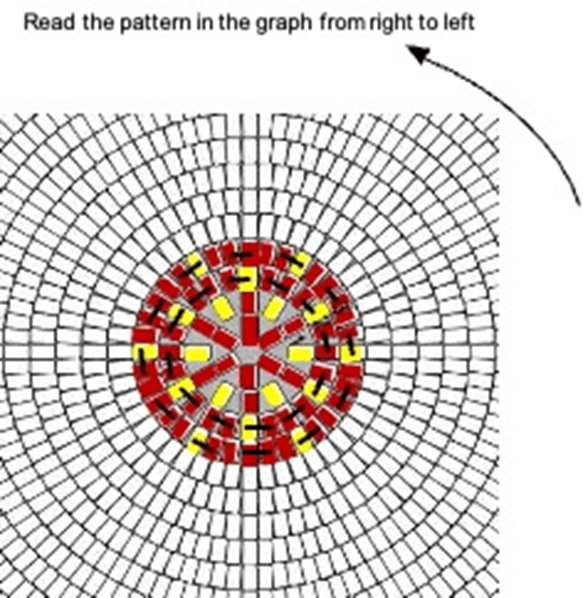
CHART 2
@mnhcrochetcreation
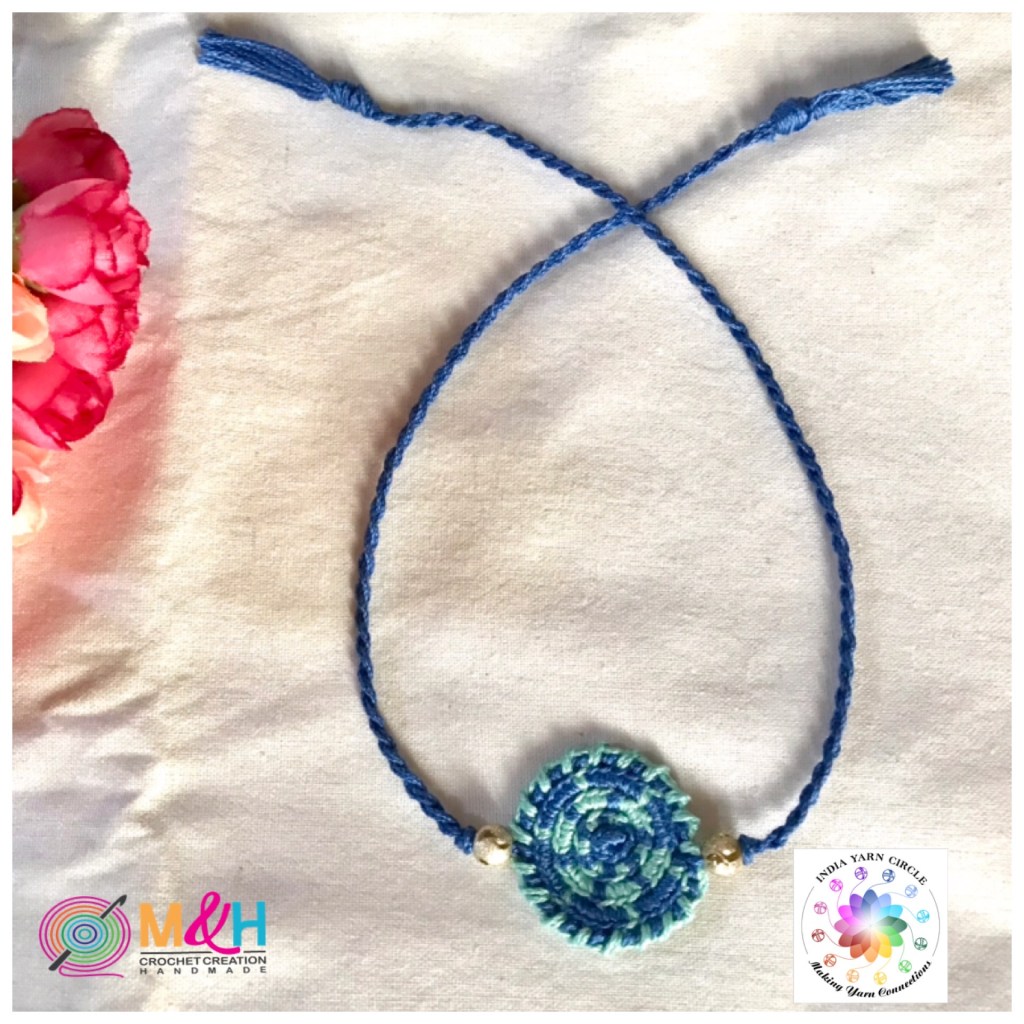
RAKHI PATTERN 2
•Please note that from Row 1 onwards, you will work each stitch in the back loop.
•Don’t forget to keep pulling the additional yarns that you carry to make your work look neat and round.
Make Magic Circle and make 6sc with colour A
Row 1:*AB inc* (6x ) [12]Add colour B ( Take 4 strands measuring 15 inches in colour A and 1 strand of colour B and them add right after you finish row 1)
Row 2:*AB inc, B inc * (6x) [24]
Row 3:* A inc, 1A, AB inc, 1A * (6x) [36]
slip stitch and cut off tall he yarns which was added.
With Yarn A make crab stitch all around and cast off. You can add beads instead of doing crab stitch.
Take 4 strands measuring 20 inches. Take 2 strands and tie it at one end where you want to make the dhaga (thread). Now twist two strands from both sides and release till it looks like a rope. Tie at the end and add one inch tassel with same yarn. You can make this dhaga with two colours also.
PATTERN TYPE 3
@mnhcrochetcreation
CHART 3
@mnhcrochetcreation
RAKHI PATTERN 3
•Please note that from Row 1 onwards, you will work each stitch in the back loop.
•Don’t forget to keep pulling the additional yarns that you carry to make your work look neat and round.
Make Magic Circle and make 6sc with colour A
Row 1:*AB inc* (6x) [12] Add colour B ( Take 4 strands measuring 15 inches in colour A and 1 strand of colour B and add right after you finish row 1)
Row 2:*BA inc, Ainc * (6x) [24]
Row 3:* A inc, 1A, AB inc, 1A * (6x) [36]
slip stitch and cut off the yarns which was added.
With Yarn A make crab stitch all around and cast off. You can add beads instead of doing crab stitch.
Take 4 strands measuring 20 inches. Take 2 strands and tie it at one end where you want to make the dhaga (thread). Now twist two strands from both sides and release till it looks like a rope. Tie at the end and add one inch tassel with same yarn. You can make this dhaga with two colours also.
To explain these instructions further in detail, Rosy has created a you tube tutorial for you:
For any queries and clarification, please feel free to leave a comment below or write to us at indiayarncircle@gmail.com
Hope you all enjoy making these Mochila Rakhis. If you do, please tag @mnhcrochetcreation Instagram/facebook page and @indiayarncircle Instagram/facebook page.
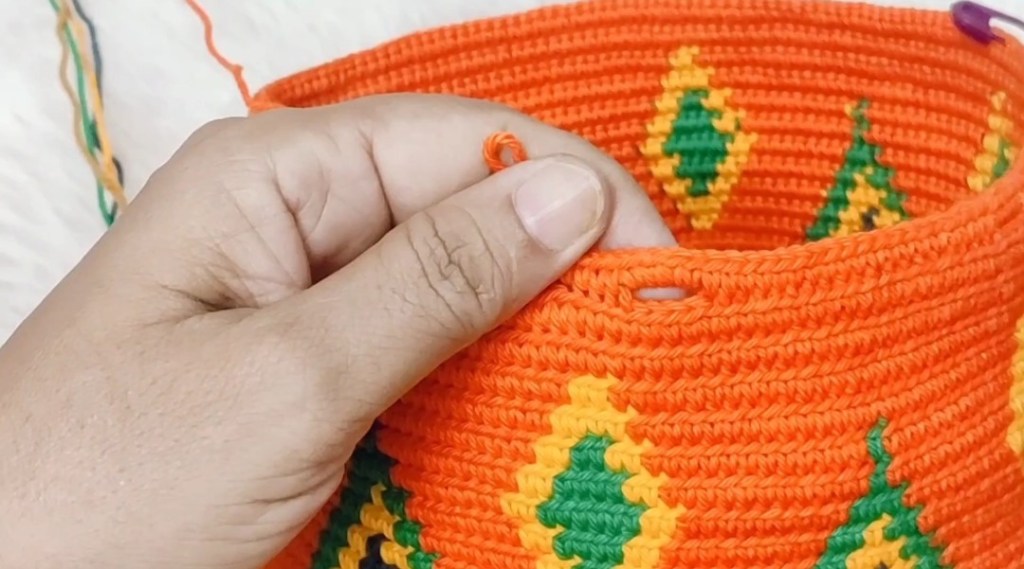
We will make Button holes in Round 33…Crochet 4 stitches around the yarns you carry. Slide the stitches if needed, pull the yarns gently. Skip 4 stitches and insert the hook in next stitch. In this video we will see how to make button holes:
As we work in spiral, there is a difference in height at the end of the round. we can minimize the height by cutting the yarns one by one in Round-36. 20 stitches before the end, cut yarn color E. 15 stitches before the end, cut yarn color D. 10 stitches before the end, cut yarn color B. At the end of the Row, cut yarn colorA.
Round-36. *30A* {6x} Round-37. Crab stitch with color C, (Do not make crab stitch in every stitch, skip every other stitch)
Graph
Thats it for Week 3! You can always get in touch with us by leaving a comment below or dm us on instagram @indiayarn.circle or join us on our facebook group where all the action happens!!
We would love to see your makes!! So dont forget to tag us @indiayarn.circle and our designer @handmadeby_ashita on instagram and facebook and use hashtags #sunburstdiamondcal #indiayarncircle #sunburstdiamondmochilacal #IYCcal
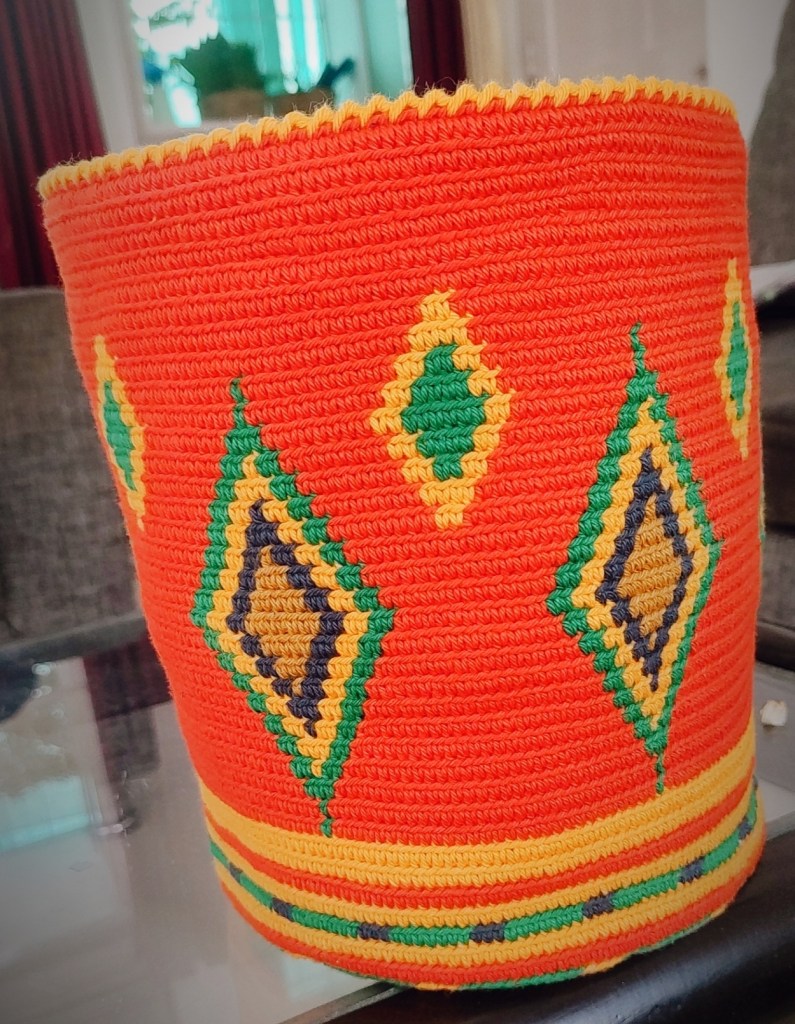
This week we will be starting with the body of the bag and as usual our guest designer Ashita has included written instructions with a video tutorial and graph!
Side of the Bag
We don’t have to make any more increases for the side of the bag. Our work will go up when we stop increasing. Every 10 or 15 stitches we push our work to 90 degree angle and pull the carrying yarns one by one and massage the stitches in the direction of the hook.
Transition from base to side
In this Video we will see how to start the side:
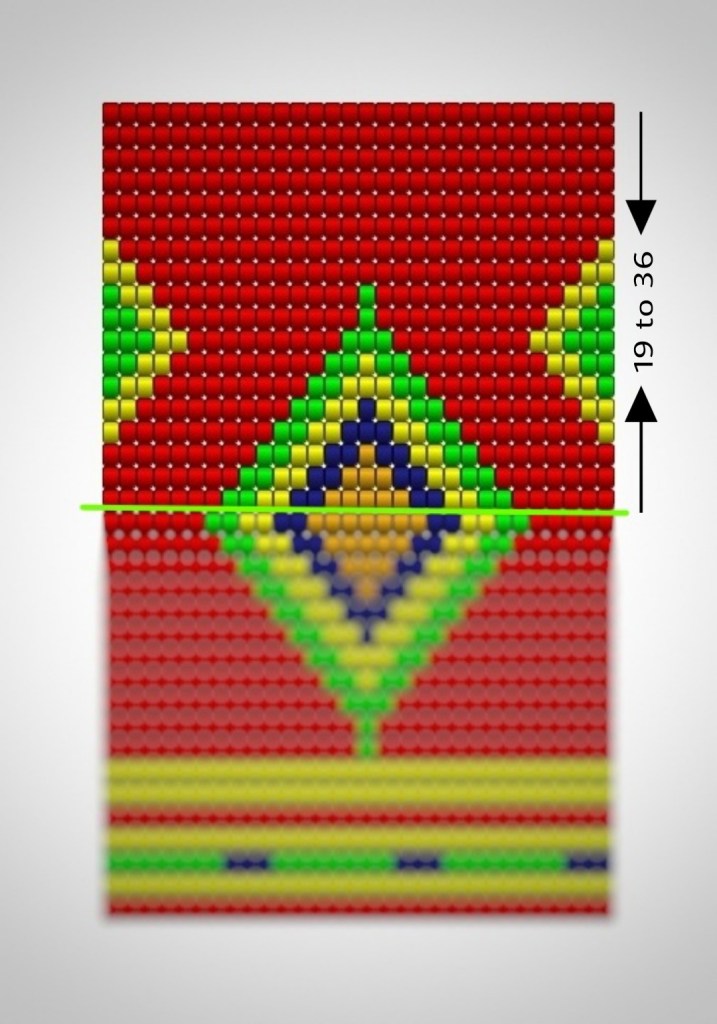
Graph
We will repeat this graph 6 times. Button holes starts at round 33.
Thats it for Week 2! You can always get in touch with us by leaving a comment below or dm us on instagram @indiayarn.circle or join us on our facebook group where all the action happens!!
We would love to see your makes!! So dont forget to tag us @indiayarn.circle and our designer @handmadeby_ashita on instagram and facebook and use hashtags #sunburstdiamondcal #indiayarncircle #sunburstdiamondmochilacal #IYCcal
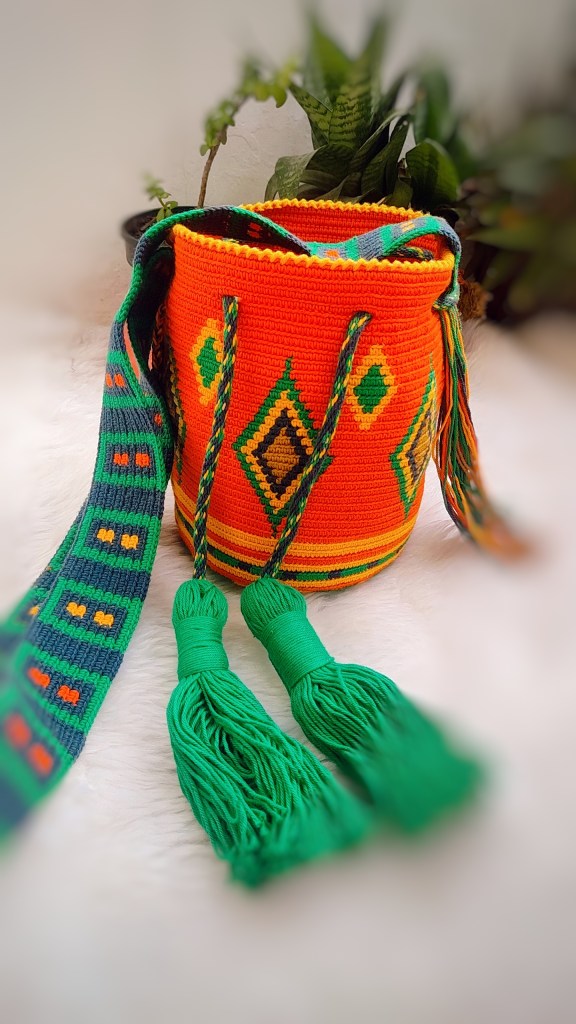
Hello Everyone!!! The Sunburst Diamond Mochila Bag CAL has begun!!! We are so excited!
Hope you have gathered all the materials required for the Sunburst Diamond Cal!
If you have no clue about what we are talking, you can check out all about the cal, our geust designer, the material list, notes on starting and tips and tricks required for the CAL, AND REGISTER HERE.
This week we officially kick start the CAL with instructions for making the base of the bag.
Week — 1: Base
Abbreviations
A = Orange B = Green C = Yellow D = Navy Blue E = Light Brown 2 C = crochet 2 stitches with color C 2 D = crochet 2 stitches with color D 2 A = crochet 2 stitches with color A 2 B = crochet 2 stitches with color B 3 B = crochet 3 stitches with color B 4 B = crochet 4 stitches with color B 5 B = crochet 5 stitches with color B 4 C = crochet 4 stitches with color C inc = increase (2 single crochet in one stitch) inc C = increase with color C inc DA = increase with 2 colors (one stitch in color D and one stitch with color A) * * = repeat what is between * * {6x} = repeat 6 times what is between * * {12x} = repeat 12 times what is between * * ( ) = total number of stitches at the end of the round
NOTES
1. The whole bag will be worked in back loops only. 2. We carry all the yarns throughout the whole bag. 3. We Pull the carrying yarn GENTLY every few stitches and massage the stitches in the direction of the hook. 4. Use the yarn FROM INSIDE OF THE SKEIN and when change the color, pick up the yarn from the skein and follow to our work. 5. Stitch counts at the end of each round is mentioned in brackets (#).
Written instructions
ROUND 1 TO 8
Round 1. With color C make 6 sc in magic circle……………………………….add yarn color A Round 2. * inc C* {6x} (12)………..add yarn color B Round 3. * inc C* {12x} (24)………..add yarn color D Round 4. *1C, inc C* {12x} (36)……….add yarn color E Round 5. *1A, inc A, 1A* {12x} (48) Round 6. *2C, inc C, 1C* {12x} (60) Round 7. *1A, 1D, inc D, 2D* {12x} (72) Round 8. *2A, 1D, inc D, 1D, 1A* {12x} (84)
LINKS
Round 1 to 4:
Round 5 to 8:
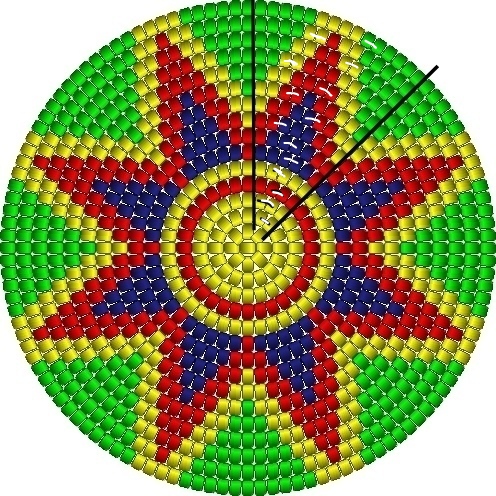
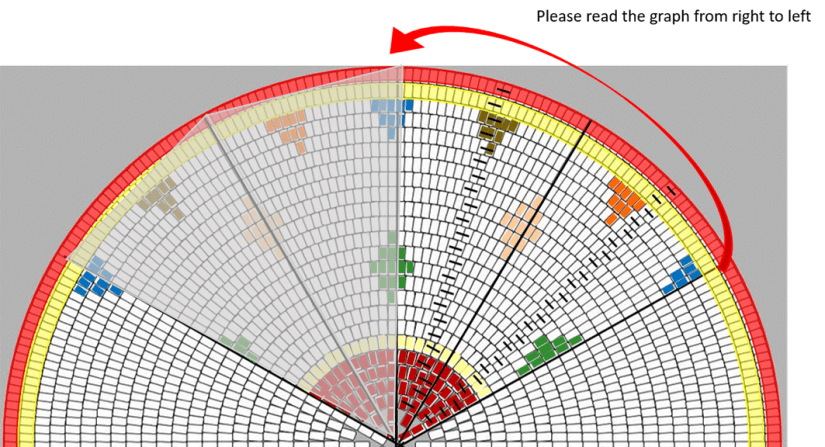
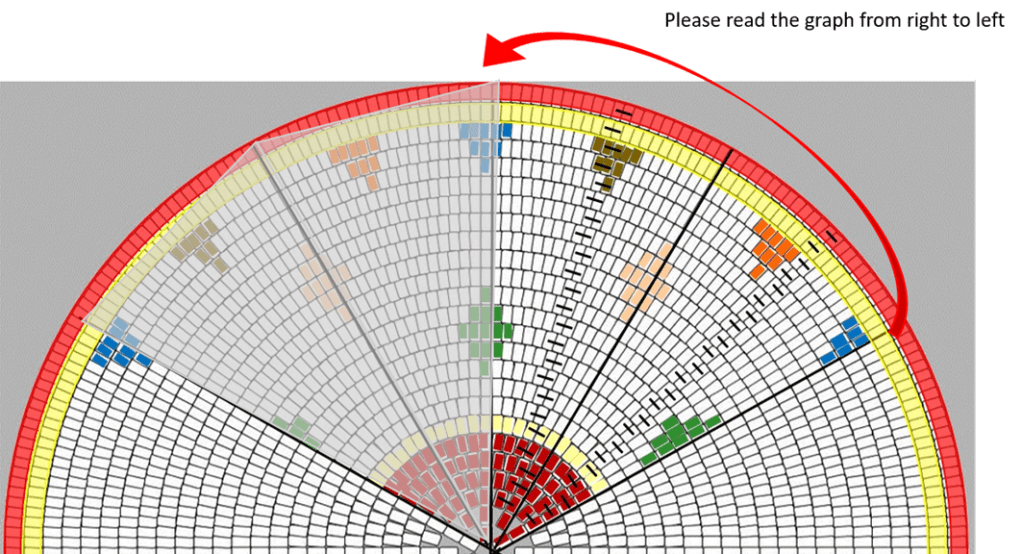
GRAPH
REMINDER
1. We will follow 1/8th part of the graph only and not the complete graph. 2. The graph starts at round 3 3. Read the graph from right to left. 4. The white lines mark the increases.
Thats it for Week 1! You can always get in touch with us by leaving a comment below or dm us on instagram @indiayarn.circle or join us on our facebook group where all the action happens!!
We would love to see your makes!! So dont forget to tag us @indiayarn.circle and our designer @handmadeby_ashita on instagram and facebook and use hashtags #sunburstdiamondcal #indiayarncircle #sunburstdiamondmochilacal #IYCcal
Can you believe week 1 of the Solitaire Mochila CAL is already over?
We hope you are progressing well in making your Solitaire Purse and we would love to see all your pics! Join our facebook group to share or follow us on instagram and tag us! Use hashtags #solitairemochilacal #mochilacal2021 #indiayarncircle
If you are new here, check out all the registration and material details HERE and Week 1 Instructions HERE
Now that you are all caught up, lets begin with week 2
WEEK TWO
Week Two is from Row 13 to Row 24
Note:
Please keep in mind all the techniques mentioned in the Week 1 CAL so that you can perfect your work.
Written instructions
Full pattern has been divided into 12 triangular parts. You will repeat 2 triangular pattern 6 times(unless specified otherwise) . (the unshaded parts are two triangles which you have to repeat 6 times)
Row 22 * 3F, 6C, inc C, 5G, 13C, 2H, inc H, 1H, 8C, 2F* (Repeat * to * 6 times) [276] pick up yarn B
Row 23 * 10B, inc B, 11B* (Repeat * to * 12 times) [288] pick up yarn A
Row 24 * 10A, inc A, 12A* (Repeat * to * 12 times) [300] cut the yarn.
Fold the round base into half exactly and put stitch markers on both ends. I made a fold along the line where you begin your rows and shifting of colours can be noticeable. If you do this, rest of your pattern will look neat.
Row 25 Leave two sc after the marker and make 1A into each. Skip 2sc before you reach the next marker. Cut the yarn. Continue on the other side the same thing and cut the yarn.
Stitching two pieces:
Have a look at Marion Verloop’s tutorial on how to join the two pieces:
By using this method just make 25 slip stitches both corners and leave the middle for stitching the zip.
Add Zip:
Stitch your zip on the extra row which you made.
Add Crab Stitch
Marion has shown very clearly how to add the crab stitch. On the last row i.e Row 25 you made sc on the back loop, so you will make crab stitch on the front loop all around.
Add Tassel:
Its upto you how you want to make your tassel but if you want to make a tassel like Marion’s then here is the link:
And that’s it!!!! Your bag is complete.
We would love to see all your pics! Join our facebook group to share or follow us on instagram and tag us! Use hashtags #solitairemochilacal #mochilacal2021 #indiayarncircle
We are so excited to start the Mochila CAL 2021 with Rosy of @mnhcrochetcreation!! Hope you all have gathered all the materials and are ready to go at it with us!
If you are new here and still wondering what the CAL is about, you can read our introductory post HERE.
Also if you still havent registered for the CAL please register at the earliest!
Mercerized Cotton Yarn. (I am using White Rose Cotton Yarn. You can use Laura Yarn, Gulera 4 Ply, Anchor 4060, Kotton 4 ply, Mercerized Cotton yarn from Yarnkart
Scissor
Zip for Bag – 18 / 20 cm
Lining Material (optional)
COLOUR INDEX
Note: The above colour index is just an example. Please use your imagination and use any colour combination of your choice.
Abbreviations
A = Red
B = Yellow
C = Cream
D = Green
E = Peach
F = Blue
G = Orange
H = Brown
2A = crochet 2 stitches with color
inc A = increase with color A inc
AB = increase with 2 colors (one stitch in color A and one stitch in color B)
* * = repeat what is between
* * [2x] = repeat 2 times what is in between
* * (12) = total number of stitches at the end of the round
Pick up different colour = before the next colour change, do a normal yarn over with current yarn and then second yarn over with new colour.
Before you start your mochila CAL, here are some of the links that you must see and learn. These are excellent step by step tutorials given by Marion Verloop:
Basic Mochila techniques
Yarn Over and Yarn Under
Adding a new Yarn
Note: Incase any of you don’t understand or want a detailed video of my pattern, please write to us or comment on our Instagram or Facebook page.
Techniques
After you have checked out all the Youtube tutorials by Marion Verloop, please remember the following points before you start the CAL
Single Crochet is always worked on the back loop. If you accidentally work the full single crochet you will see the difference it looks very different
Always mark the first stitch of the new row with stitch marker
In mochila, you will never slip stitch before moving onto the next round. Just remove the stitch marker and carry on to the next row.
When you change your yarn colour, pull up the new colour yarn in the second pull through.
Stitches have to tight so that other colour yarns are not visible.
Please read the graph from right to left
Measurement
Size of the round base is 26cm
When you fold it, you will get a height of 12cm
Week 1
Written instructions
Full pattern has been divided into 12 triangular parts. You will repeat 2 triangular pattern 6 times. (the unshaded parts are two triangles which you have to repeat 6 times)
1. With colour A crochet 6 sc in the magic circle
Row 1 2A in each stitch (12) Add colour B
Row 2 *2A inc* (24) Add color C
Row 3 * inc A, 1A * (Repeat * to * 12 times) [36] Add colour D
Row 4 * inc A, 2A * (Repeat * to * 12 times) [48] Add colour E
Row 5 * 1A, inc A, 2A * (Repeat * to * 12 times) [60] pick up yarn B in the last stitch
Row 6 * 1B, inc B, 3B * (Repeat * to * 12 times) [72] pick up yarn C in the last stitch
We cannot wait to see your colour choices and your makes!! tag us @indiayarn.circle and @mnhcrochetcreation and use the hashtag #mochilacal2021 and #solitairemochilacal
Please feel free to comment and revert with your queries below or join our facebook group where the CAL is being hosted or DM us on instagram
We are back with a new crochet along!! This one is going to be super fun and exciting!! We have an out of the normal, new technique and style of crochet this time and it is hosted by Rosy of MNHcrochetcreation!!
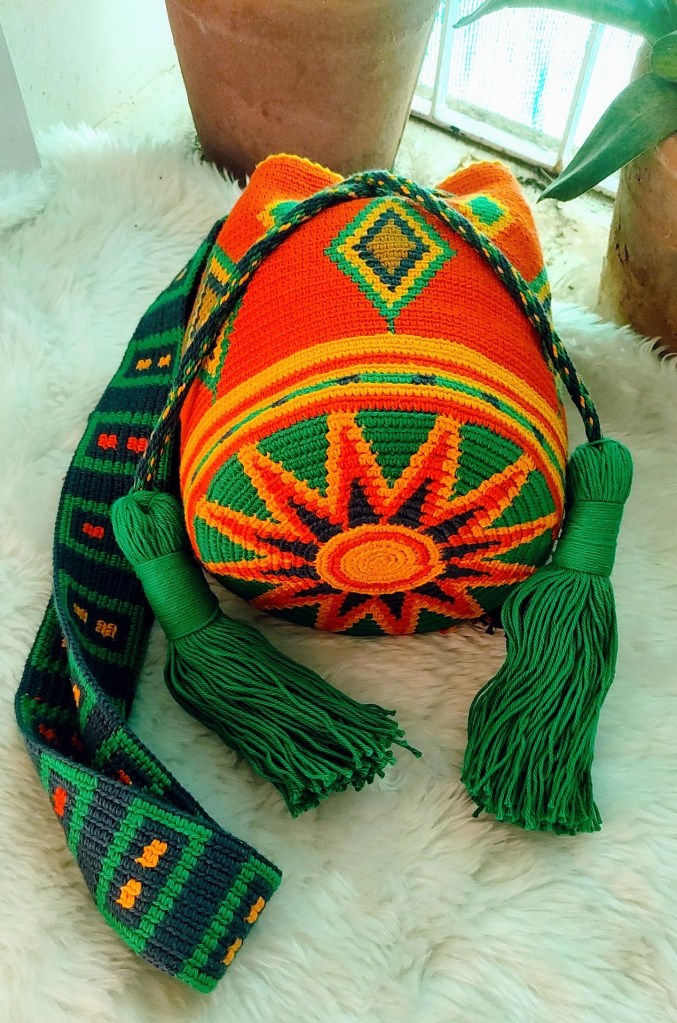
So what are we exploring this CAL?? Why ofcourse its Mochila crochet!!
Want to know how to participate and register Scroll to the end of the post!
Dont know what Mochila Crochet is or what to do in it?? Fear not, We are here along with Rosy to help, guide and explain everything about it!!
Before we dive into the details of the CAL lets first hear a little from our host – Rosiland Bakshi.
Hello,
My name is Rosy Bakshi short for Rosalind. Just a very small introduction about myself.
I am a mother of two. My son Mayank is 26 years old and daughter Hina is 18 years old. I work for an airline for the past 25 years.
I have always been very interested in handwork. It can be anything, whether it is any paper artwork like quilling, making envelops or gift bags or thread work like embroidery and cross stitch. I had no knowledge about knitting or crochet. I learnt crochet and knitting from YouTube in order to teach my daughter for her school project. That was 3 years back. My family members and close friends saw my work and encouraged me to start this work professionally. Without thinking too much about the success of my work, I created a Facebook page on 8th March (Women’s Day) and named it after my children M & H Crochet Creation.
I love colours so whenever I see any Crochet work with lots of colours, I immediately get very fascinated by it. I came across Mochila work 3 years back and wanted to try it but was very intimidated by the complicated designs and beautiful work created by so many artists as I was a beginner then. It took me 2 years to finally try it and all thanks to Marion Verloop and her weekly CAL (Crochet along) that I was able to learn (very slowly). I am yet to master this art completely, hence, I should be the last person to take up a CAL for Indiayarncirle group, but having said that, I also believe that its better to share whatever I know about this beautiful art with everyone rather than do nothing at all. Besides, Indiayarncircle’s main objective is to help others learn all kinds of yarn related art. I managed to create a simple Mochila Clutch pattern so that everyone can start with a simple and small pattern before venturing out to try bigger projects. My Solitaire Mochila Clutch pattern is coming your way soon.
History of Wayuu Mochila Crochet:
Mochila is a Spanish word which meant “backpack”
Wayúu are best known for the beautiful and colourful crochet textiles created by women. They even have a popular saying: “To be a woman is to know how to weave.”
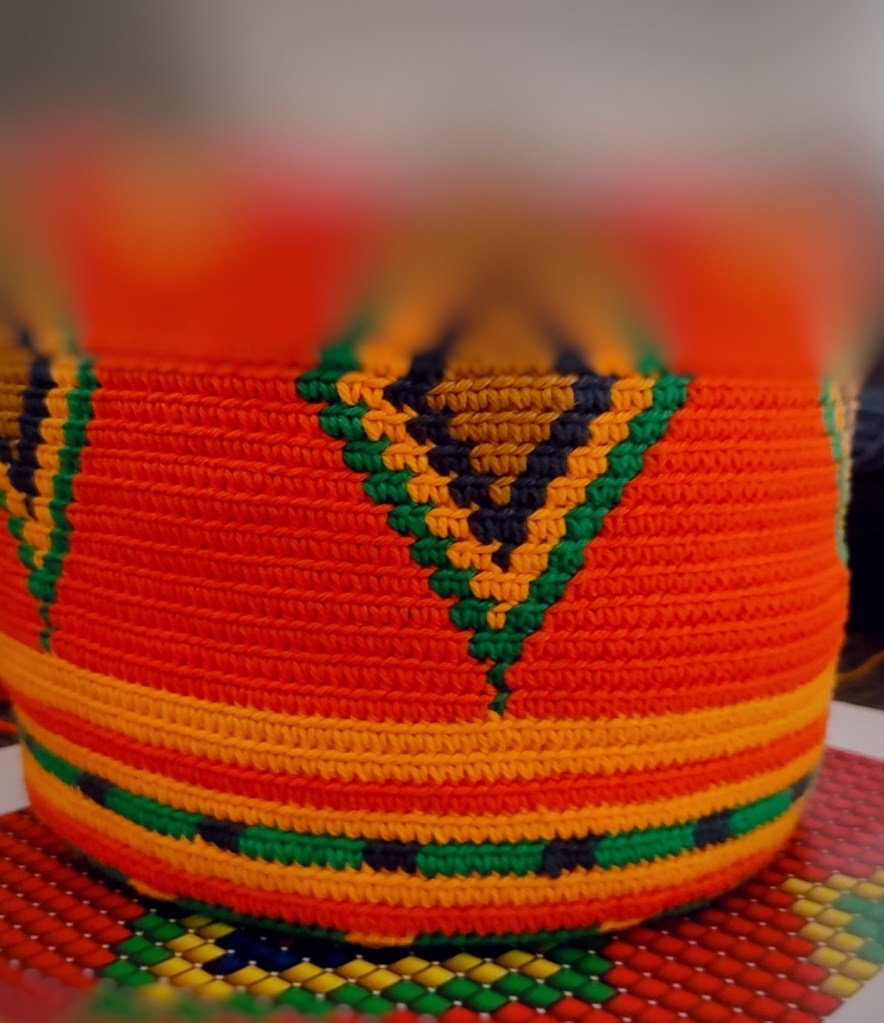
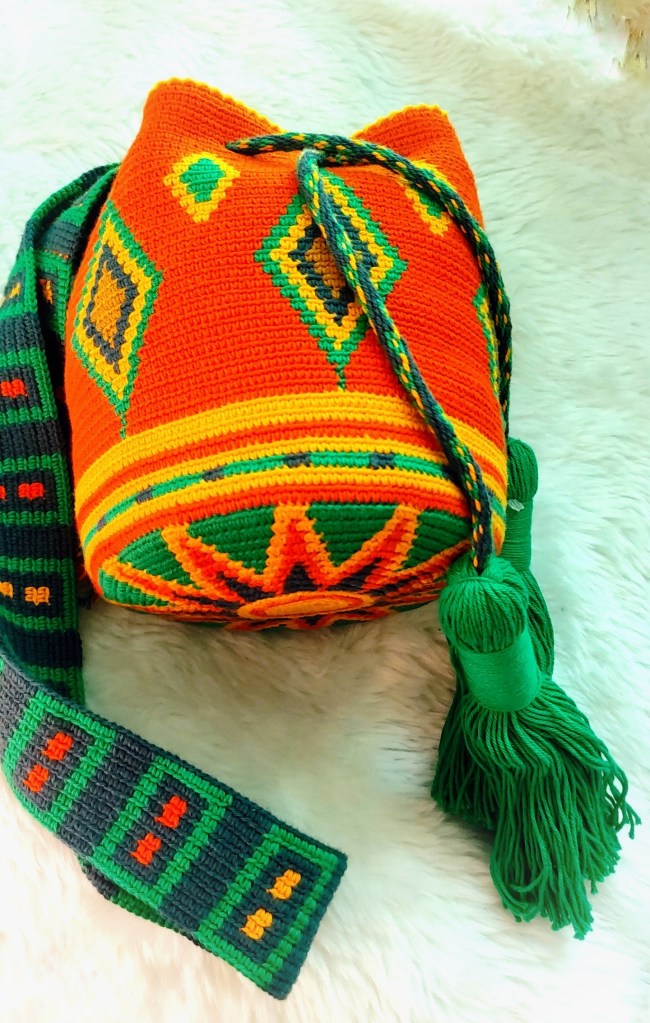
The most common woven creations are the mochilas, small bags, made of colourful yarn with intricate patterns and motifs. Through the motifs, the weaver shares their cosmological view of the universe, and their traditions. The techniques are passed from generation to generation of women, making it one of the primary traditional aspects of the tribe, included as a rite of passage. Mochilas, chinchorros (hammocks), and other woven creations, have become a means of economical income for Wayuu women who sell them to tourists or people outside their tribe. The mochilas have raised awareness of the tribe, as well as the critical conditions they face.
If you have ever travelled to the Caribbean, you may see Mochilas on exhibit in vendors and most of you will recognize they are not like a cheap purse.
What Is Wayuu Crochet?
If you have ever done tapestry crochet, you have partially trained already. Primarily single crochet, but you can use other stitches too, you carry the unused yarn strands under the working stitches. So, there are no bobbins associated with colour switching. As you need to change colour, you need to pull up the colour you need and place the existing colour under the next stitch.
Wayuu Crochet is not a quick going process. It is slow going and intricate. The end results are second to none. It can take 2 weeks up to one full month for a person to weave a single bag depending on the complexity of the design and skill of the weaver. Weaving these bags takes great dedication from these Wayuu women and really shows how devoted they are to their craft! Today, the Wayuu bags are a crucial part of the Wayuu economy and means for financial support, which enables them to preserve their culture, traditions, and way of life.
Mochila art is similar to tapestry. Difference between them is:
In Mochila single crochet is done only at the back loop whereas in tapestry you do a full single crochet.
Also, if you have ever submitted your work at Marion’s Facebook group, you will promptly be corrected by her saying “keep your stitches small and tight” the reason for this is that all the yarns you carry is well hidden. In tapestry you can keep your stitches close but it’s not something that you have to be particular about.
How to understand Mochila techniques?
Please do watch all the Tutorials hosted by Marion Verloop. English is not Marion’s first language but she does an excellent job for us to understand her. We will be putting up all the links along with our weekly pattern so that it’s easy for all of you to understand.
Now lets check out the material list. Since the quantities are lesser you could dive into your own stash and scraps to work on this project!
Level
Easy/ Beginner
Material List
Mercerized Cotton Yarn. (I am using White Rose Cotton Yarn from Crochet Bella. You can use Laura Yarn, Gulera 4 Ply, Anchor 4060, Kotton 4 ply from Magic Needles, Mercerized Cotton yarn from Yarnkart.
Scissor
Zip for Bag – 18/20 cm
Lining Material (optional)
Hook Size
2mm
It is extremely important that you do not use hook size bigger than 2.5mm because you will want to keep your stitches close and tight.
Colours and Yardage
COLOUR A – 30 gm
COLOUR B – 30 gm
COLOUR C – 75 gm
COLOUR D – 15 gm
COLOUR E – 15 gm
COLOUR F – 20 gm
COLOUR G – 20 gm
COLOUR H – 20 gm
Note: The above colour index is just an example. The project uses 8 colours but you can use 4 to 5 colours too. Please use your imagination and use any colour combination of your choice.
Schedule of the CAL
We will start the Solitaire Mochila Clutch CAL on the 10th of May, 2021. The first week is for Registration and material gathering.