Hello Everyone!! Hope you all have enjoyed working on the first prompt and have been consistent!!
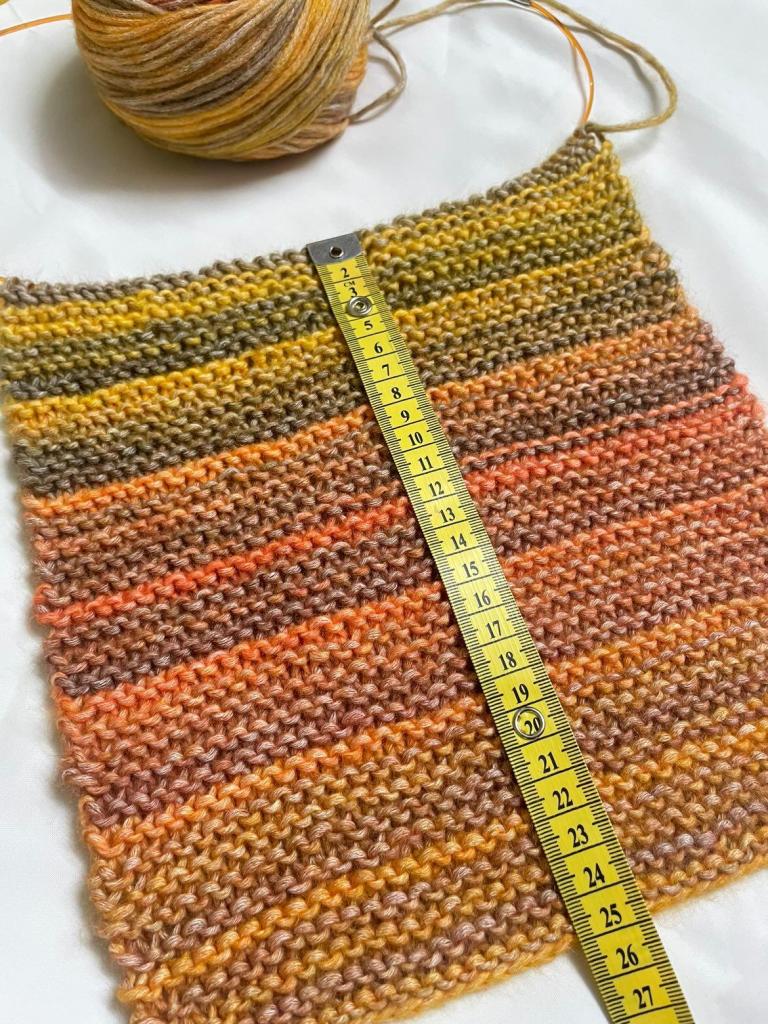
We are thrilled to see all of your WIP so far, and your enthusiasm for this M-MAL deserves a round of applause, and we hope you have already finished 25cm. Do share your progress pictures and tag us @indiayarn.circle and @knitting_library.
@knitting_library progress picture.
As we begin the second week and continuing the fun, we bring you the second prompt for your project!!
For both knitting and Crochet the second prompt is COLOURWORK!!
Instructions:
Add one or more colours as per your choice in any kind of colour work pattern.
You can make stripes, cheverons, motifs or any jacquard pattern in any stitch as per your choice.
These are some reference tutorials for begginers, but you are allowed to use any other colour work pattern of your choice!
For Knitting:
1. Stripes using two or more colours:
Note- If you are thinking of working with a stockinette stitch, be sure to work a few edge stitches (garter, moss, rib) on either side of your work to avoid curling up edges.
2. Intarsia with two colours:
3. Chevron using two colours:
4. Jacquard pattern:
5. Houndstooth / Fair isle:
For crochet:
1. Two colour stitch pattern:
2. Crochet chevron stitch
3. Mosaic crochet:
4. Tapestry crochet:
Now you have to follow this prompt until we reveal our next prompt.
Reminder: be consistent with 5cm of knitting/crochet daily. So that you can enjoy the fun of revealing the next prompt.
Now that you have registered, are you ready to begin??
So here we are…. drum roll please….. with our very first prompt!! Are you excited??
Grab your hooks and needles and your yarn and get started!!!
Choose your project.
Decide what type of make you want to begin with – either a scarf or a shawl.
For a scarf keep the width of your project at around 8 to 10 inches
For a shawl keep the width between 12 to 15 inches.
Based on your project you can start/cast on with the desired number of stitches or chains.
Knitting Prompt 1 – Group A:
Work on any ONE of the following stitches as per your choice of project.
1. Garter stitch: Garter stitch uses only one stitch – the basic knit stitch. You knit each and every stitch on every row (right side and wrong side), simply stopping to turn your work over when you’re ready to begin a row anew.
2. Double Moss stitch: Cast on an even number of stitches Row 1 and 2: *K1, P1; repeat from * to end of row Row 3 and 4: *P1, K1; repeat from * to end of row Repeat Rows 1-4 for Moss Stitch flat
3. Moss stitch / seed stitch: Cast On an Odd Number of Stitches Your knitting pattern ( * K1, P1 * K1 ) is repeated on every row.
4. Rib stitch 2*2: Cast On: number of stitches divisible by 4. Row 1 (RS): (k2, p2) till the end of the row. Row 2 (WS): (k2, p2) till the end of the row. Repeat these two rows.
Crochet Prompt 1 – Group A:
Work on any ONE of the following stitches as per your choice of project.
1. Moss Stitch: Ch an even number of sts. Row 1: Sc in 4th ch from the hook, *ch 1, sk 1 ch, sc in next ch, repeat from * across. Row 2: Ch 2, turn. Sc in the next ch-1 sp, *ch 1, sk 1 sc, sc in next ch-1 sp, repeat from * across. Repeat row 2.
2. Extended Single crochet: Insert your hook, YO and pull up a loop, YO and pull through one loop, YO and pull through remaining two loops
3. Herringbone hdc: To make the HHDC stitch:
Yarn over, insert hook into next stitch and pull up a loop (3 loops on hook)
Pull first loop straight through the second (similar to a slip stitch)
Yarn over, pull through two remaining loops on hook.
In our first prompt, we have given multiple options for you to choose from. You can use any one stitch to work your first part. Now, work according to this prompt until we reveal our second prompt.
Reminder: be consistent with 4-5cm of knitting/crochet daily. By the end of week, you would have easily completed 20 -25 cm of your project!!
So you will enjoy the fun of revealing the second prompt.
Hello Everyone!!! We are back after a hiatus and we have a super fun activity for all of you to get on board with us again!
This time we are bringing you a new, fun, yarn stash busting activity!
Also this Make along is for all!! Yes you heard that right!! Knitters and Crocheters both are welcome to join the MAL, as there will instructions for both crafters every week.
So lets go ahead with the details!!
Who can participate
Everyboby!! No matter If you are a beginner or advanced knitter/crocheter. You all are welcome to join this MAL with basic knowledge of knitting/crochet.
Timeline:
The MAL will start on the 1st of May and will go on for 6 weeks. Each week a new prompt will be announced, both for knitters and crocheters.
What yarn to use:
You can pick and choose any yarn for this Project, even better if its from your own stash!! You can choose as many colours you want or make it monochrome – Its all upto you!!
Any thickness of yarn will work for this project, just be mindful of the repeats. The width and length can be determined by you as per your requirement. Our Recomendations are fingering weight, Sport weight, Dk weight, and Aran weight yarns.
What to expect:
The motive of this MAL is to be consistent and creative. So you must be willing to knit/crochet few rows and repeats amounting to at least 4-5cm every day.
This will ensure that you will have covered approximately 20-25cm length every 5th day. By the end of the MAL, you will have an approximately 150cm long scarf/shawl.
What is the mystery:
Now, the mystery part!
There will be a total of 6 prompts, and we will disclose each prompt one by one after every fifth day. Which means you have to work according to the prompts.
Prompts are like a set of instructions, which will have options and you can choose what interests you. This part will be fun and creative.
We have designed the prompts carefully, but If at any point you find it challenging, Nikita of @knitting_library and the IYC team will be here to guide and help you choose what to do next.
Rewards
At the end of the MAL the top five best works will get featured on the IYC OFFICIAL WEBSITE AND INSTAGRAM PAGE. The voting will be conducted after the completion of MAL to choose the best five among all.
Remember, this is not a competition! It’s just a fun activity to bring the community a little closer.
Now that you have all the details, Here is how you can participate–
1. Register
You can register for the MAL by filling the details on the link below:
At India Yarn Circle, we love encouraging makers and aim to unite our community and make us stronger.
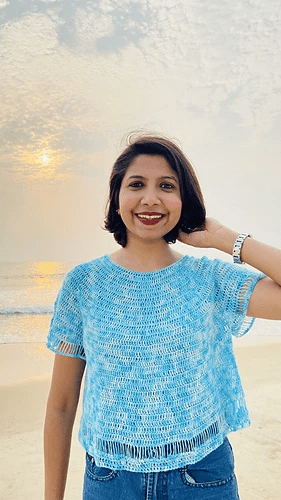
If you are looking for a great collection of crochet tops to make, then this is the place for you.
Crochet is IN this season and her we have a roundup of Indian Crocheters who design. They have some amazing designs out and they are great to beat the heat during the summer days.
Crochet Top Patterns
Crochet tops are a great way for beginners to move into the space of crochet garments. They usually have simple stitches are these tops are perfect to dive into the concept of gauging and shaping. When making clothes it is essential to check gauge and to understand how the yarn used will behave when washed. All the patterns given below can be made in cotton and are perfect for Indian weather.
This simple, soothing flowy tee can literally be your first crochet project ever. It uses double crochet stitches and has increases at regular intervals. The explanation that Smitha has given for the name is even more inspiring to make the top. The word Kaizen refers to how small continuous changes can make a tremendous difference. The top is available in 9 sizes and it designed to be work with 2-4 inches positive ease. The pattern is also available in 10 junior sizes.
Taara Vest is another fun and colourful accessory that can become a permanent addition to your wardrobe. It is absolutely beginner friendly and give the right amount of desi touch.
If you are a beginner wanting to make more than just dc, this is the perfect pattern for you. A super simple construction which can complete your casual summer ensemble. It has a beautiful texture, feels light and airy and has a combination of Filet flower motif, granny stitch and Picot stitch. The pattern is available in six sizes and uses 3ply cotton. Another bonus – this pattern is also available as mogra junior for ages 3 to 10 years and it looks super cute.
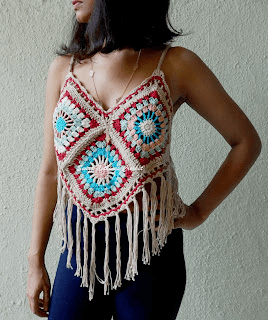
One of the first Indian blog I had come across was Sweet Nothings Crochet. It has an array of free pattern for clothes, accessories and so much more. The one featured here is the Granny square Boho/Beach top, which is a customizable pattern. This is an easy granny square adapted to make a top, and if you have made one granny square before, this one is going to be an easy peasy blast.
Fold the piece in half, along the shorter edge- the longer sides will join each other.
Make sure the middle heart is in the right direction. Count 24 rows from the right end and join the two long edges with a stitch marker A (Left handers use B). Repeat on the other side using the other stitch marker.
Using the long tails, sew the two long edges together from the end of the shawl till the respective stitch marker, on both sides. This will create the sleeves and leave the middle open.
Try on the shrug to check if the body fits- at this point, you can adjust the number of rows stitched together from both sides.
Join the yarn at stitch marker A and work 1 sc2tog across the side of the dcs from both edges of the scarf. Make 1 more sc in the same dc. Work 2 scs into the side of every dc of the body, till you reach the stitch marker B. Again, work 1sctog across the side of the last dc and the first dc of the other edge. Remove the stitch marker
1 hdc in the same dc (place B in this hdc). 2hdc into the side of every dc till you reach A. Join with a slip st to the first st of the round. Move marker A to the first stitch of the next round.
Round 2: 1sc in each sc and 1 hdc in each hdc. Keep moving the markers up to the next row as you work.
Repeat round 2 two more times. Cut the yarn and sew in the ends.
(Note- The hdc side makes the collar)
For the sleeve edge (the shorter ends of the scarf make the sleeve edge) – join the yarn at the seam, 1 sc in each st around. Join with a sl st to the first sc.
Repeat the round once more.
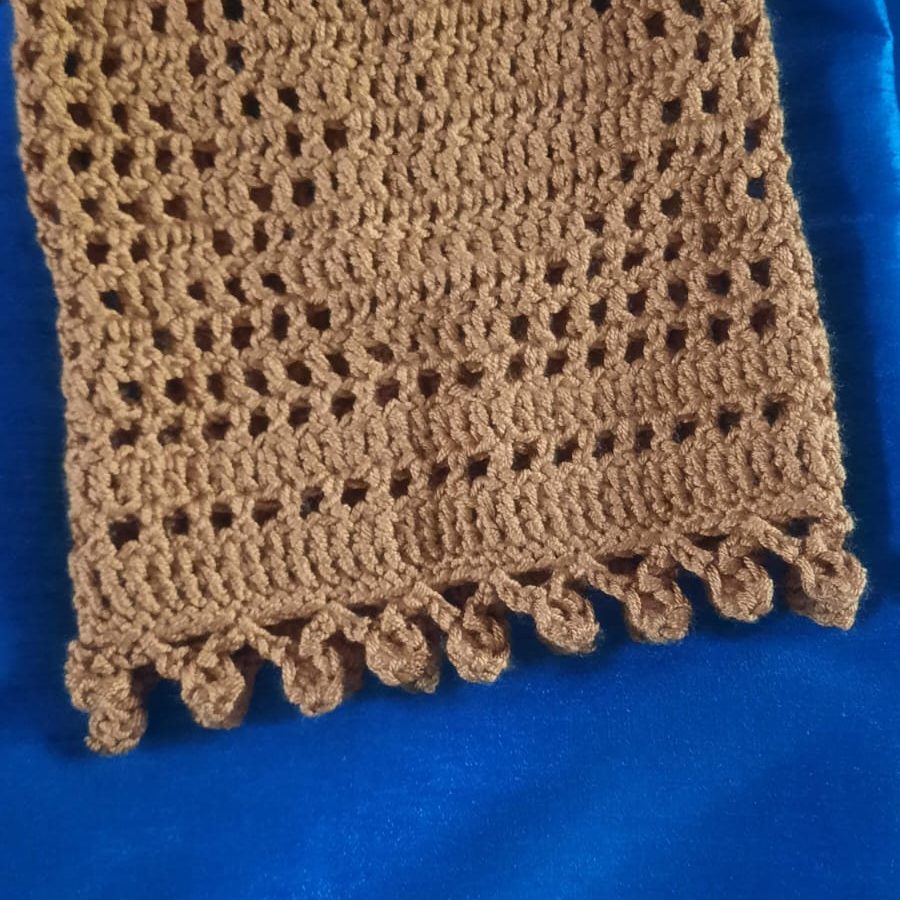
If you want a tassel edge, follow the directions below-
Ch 6, 3dc in the 3rd chain from the hook, ch 3, sk 3, sl st into the next st. Repeat around the edge. Sl st to the beginning ch to finish. Cut the yarn and sew in the ends.
PATTERN Leaving a long tail of about 75cms (30”) Ch 73. 1 dc in the 3 rd ch from the hook and in each ch till the end. For a neater edge, work each dc in the back bump of the chains. (71dc) Alternatively, do 71 fsc turn and 1 dc in each fsc across. Row 1 is complete.
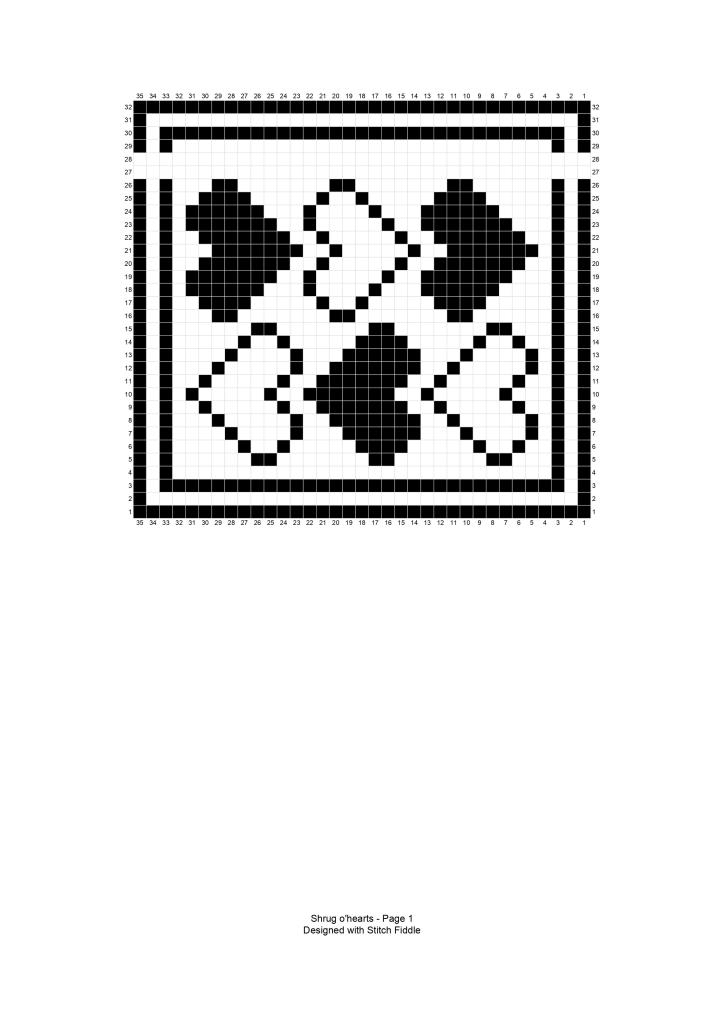
Follow the rest of the pattern from the graph, given on the last page. Right handers- Start from row 1 column 1 and work in the direction of the orange arrow. Left handers- Start from row 1 column 35 and work in the direction of the blue arrow.
TURN YOUR WORK AFTER EVERY ROW. The following repeats complete the main shawl.
Repeat rows 5 to 26 a total of 4 times.
Then, repeat rows 5 to 15 one time.
End with rows 29 to 32. At the end of row 32, cut the yarn, leaving a long tail approx. 75 cms (30”)
MODIFICATIONS To make a smaller size, use fingering yarn and a 3mm hook. To make a larger size, use #4 yarn and a 7 mm hook. Alternatively, work the filet crochet with 4dc across the filled squares. The open squares are made with 1dc, ch2, sk2, 1dc
Graph is designed using http://www.stitchfiddle.com Please share your work on social media using the hash tags #indiayarncircle #aarabydina
Filet crochet is one of the oldest crochet techniques which produces intricate patterns and pictures using just double crochets and chains. Traditionally Filet is worked with thread and a fine hook.
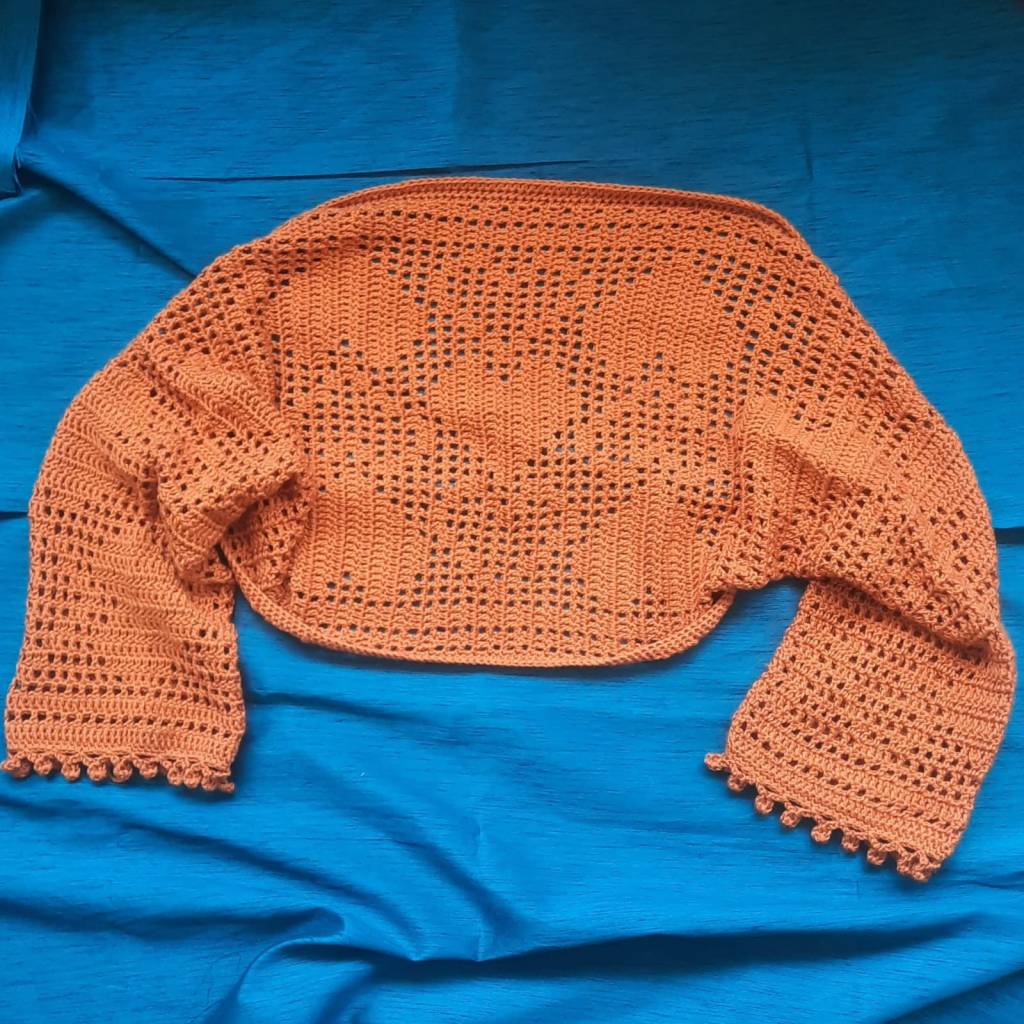
As an introduction to Filet, the Shrug o’ Hearts is a wearable made with DK yarn. The shrug is loose fitted and accommodates for many different sizes. It uses hearts as the basic pattern.
Notes: The pattern is worked from a graph. The Filet pattern is worked with 3dc or 4dc depending on the size you wish to achieve. The finished size is with the recommended yarn. Changing the yarn will change the size of the piece. The pattern is worked from side to side. Mark each row as you work it. The pattern uses US terminology. Both Left and Right-handed instructions are included.
MATERIALS 750mts/300g, #3 Yarn (820yds) Sample made with Nako Saten 5 mm hook Scissors Yarn needle 2 stitch markers of different colours (A and B) Measuring Tape
GAUGE 18 dc x 8 rows = 10 cm (4”) square
ABBREVIATIONS Ch- chain Sc- single crochet Sc2tog- two sc together Fsc- Foundation Sc Hdc- half double crochet Dc- double crochet Rpt- repeat Sk- skip
Finished Size of the shawl: 41 x 140 cm (16”x 55”) Fits sizes S to 2XL. Modifications are given for other sizes.
Basic Stitch Requirements sc- insert hook into the stitch, yo, pull yarn back through the stitch (2 loops on the hook), yo, pull through 2 loops hdc- yo, insert hook into the stitch, yo, pull yarn back through the stitch (3 loops on the hook), yo pull through all 3 on the hook dc- yo, insert hook into the stitch, yo, pull yarn back through the stitch (3 loops on the hook), yo pull through 2 loops, yo, pull through remaining 2 loops on the hook
FILET CROCHET BASICS Normally filet crochet is worked with 4dc across the squares. However, note that this pattern is worked with 3 dc across the square. This will give the recommended size. The edge dc of each square is shared with the next square. The filled squares are the solid blocks, made with 3 dc If there are 2 filled squares next to each other- 5 dc in all. NOTE- The solid block at the beginning of each row is made with a ch3 followed by 2dc. The open squares are the mesh, made with 1dc, ch1, sk1, 1dc. If there are 2 mesh squares next to each other – 1dc, ch1, sk1, 1dc, ch1, sk1, 1dc. So, if you have 1 filled square and 1 mesh next to each other, you will do 3 dc, 1 ch, sk1, 1 dc.
MODIFICATIONS To make a smaller size, use fingering yarn and a 3mm hook. To make a larger size, use #4 yarn and a 7 mm hook. Alternatively, work the filet crochet with 4dc across the filled squares. The open squares are made with 1dc, ch2, sk2, 1dc
About the Designer
An educator by profession, Dina Sengupta has been crocheting for the past nine years, when she taught herself the craft. Her business, Aarabydina, was established five years ago. Since then, she has been designing and crafting her own crochet creations, as well as teaching others how to crochet. Dina enjoys the creative expression that comes with crocheting and loves the challenge of designing new projects. She prides herself on creating pieces that are functional and fun. She deftly incorporates her skills as an educator into passing on her knowledge and helping others learn the craft of crochet.
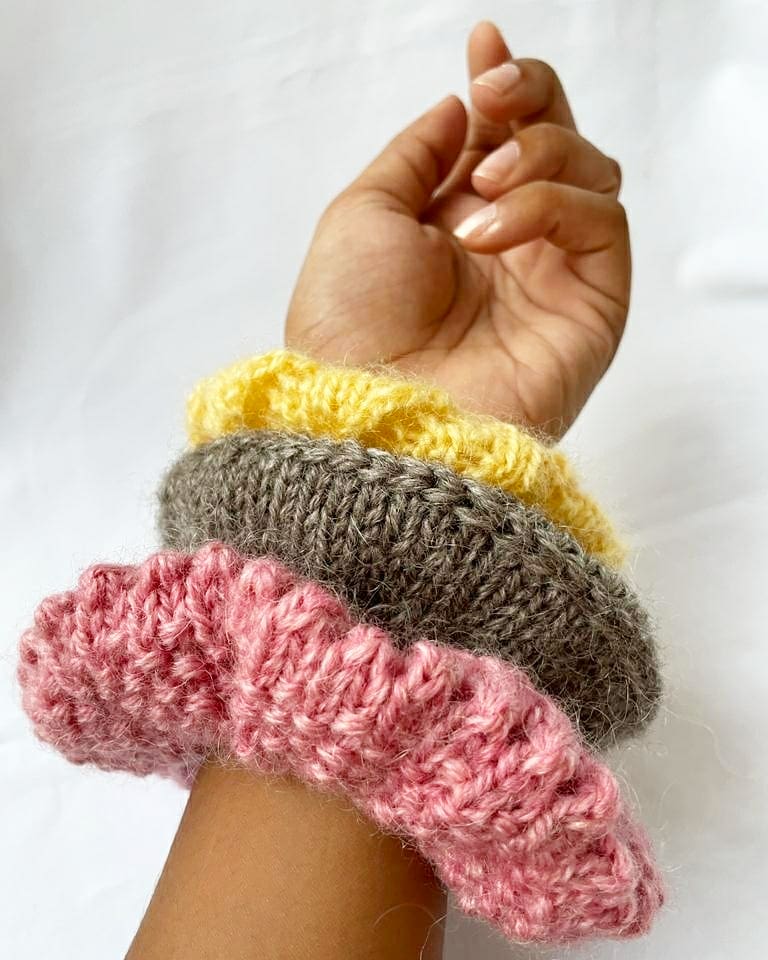
Wishing you a Happy New Year. We are so happy to announce that our first featured designer for the blog is Nikita Chouhan from @knitting_library.
Nikita is 25 years old and has been knitting for almost three years now. She is an excellent designer and makes really amazing sweaters, socks, beanies, gloves, and so much more. If you haven’t seen her Instagram page yet. Check it out now!!!
The feature consists of three different scrunchies patterns. Why scrunchies? Because you can never have too many scrunchies. Scrunchies are quick to make and are a great way to use scrap yarns.
FROM THE DESIGNER
Making scrunchie is one of my favourite ways of using leftover yarns. I designed three scrunchie patterns combining simple knitting techniques and stitches that are beginner-friendly and fun to knit.
OVERVIEW
The scrunchies are worked flat, back and forth using straight needles, and then sewed at the end. This pattern is written for one size, but you can change the length and width as you want.
SIZE
One size
MEASUREMENTS
Length 10 inches, Width 3 inches
GAUGE
10 sts/12rows over 5 cm × 5 cm in stockinette stitch.
USED ABBREVIATIONS
K – knit P- purl St(s)- stitch(es) RS- right side WS- wrong side CO- cast on K2tog- knit two together Yfwd- yarn forward or yarn over BO- bind off LH- left hand RH- right hand
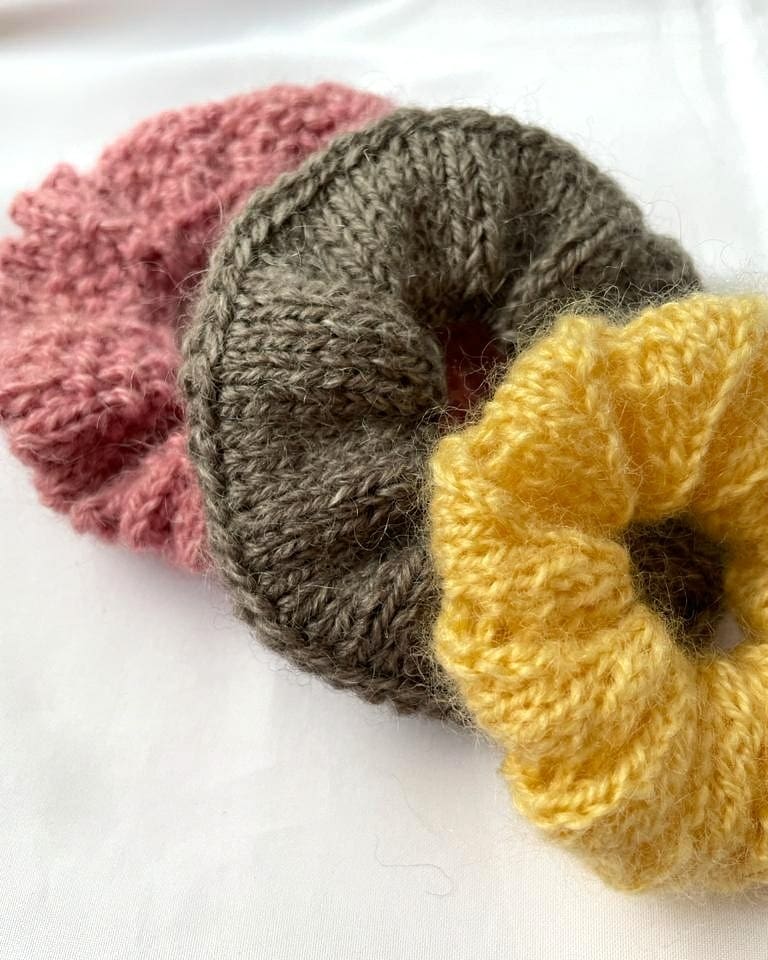
PATTERN 1 – YELLOW, DIAGONAL LACE SCRUNCHIE
MATERIALS
Yarn : Sample used single strand of Vardhman swiss mohair in color butter. You can use any yarn of your choice. Needles : 4mm straight needles.
PATTERN 1
Using 4mm needle CO 57sts using long tail cast on method. Row1 (RS)- k1, k3, k2og, yfwd, rep from to last st,k1 Row2, 4, 6, 8 (WS) – purl all sts Row3 (RS)- k1, k2, k2og, yfwd, k1 rep from to last st,k1 Row5 (RS)- k1, k1, k2og, yfwd, k2 rep from to last st,k1 Row7 (RS)- k1, k2og, yfwd, k3 rep from to last st,k1 Row9 (RS)- k2og, yfwd, k3, k2tog rep from ending last repeat k2 Row10 (WS)- P all sts
Repeat the above 10 rows one more time BO off all the sts.
FINISHING
Fold the knitted piece in half and sew the scrunchie keeping the elastic band inside.
VIDEO TUTORIAL
You can check out the video tutorial for this pattern by our Featured designer.
PATTERN 2 – PINK, PICOT & MOSS SCRUNCHIE
MATERIALS
Yarn : Sample used 2 strands of Vardhman lamb hair in color candy pink. You can use any yarn of your choice. Needles : 4.5mm straight needles.
PATTERN 2
Using 4.5mm needle CO 55sts using long tail cast on method.
Starting from RS work
Row 1, 3, 5 (RS)- k1, p1 repeat to the end of the row, ending with k1 Row 2, 4,6 (WS)- k1, p1 repeat to the end of the row, ending with k1 Row 7 (RS)- knit all sts Row 8 (WS) – purl all sts Row 9 (RS)- k2tog, yfwd repeat to the end of the row Row 10 (WS)- purl all sts Row 11 (RS)- knit all sts Row 12, 14, 16 (WS)- k1, p1 repeat to the end of the row, ending with k1 Row 13, 15, 17 (RS)- k1, p1 repeat to the end of the row, ending with k1 Row 18 (WS)- purl all sts
BO all the sts.
FINISHING
Fold the knitted piece in half at eyelet hole row and sew the scrunchie keeping the elastic band inside.
PATTERN 3 – GREY, LATERAL BRAID SCRUNCHIE
MATERIALS
Yarn : Sample used 2 strands of Vardhman lamb hair in color cinder rock. You can use any yarn of your choice. Needles : 4.5mm straight needles.
PATTERN 3
Lateral braid written instructions
Setup step – CO 1 st and place it on a left needle.
Step 1- knit the second st through the back loop of LH needle, leaving it onto the LH needle knit the first st through the front loop, now drop both the sts off the needle.
Step 2- slip the last worked st back on the LH needle from RH needle.
Start pattern from here
Using 4.5mm needle CO 55sts using long tail cast on method. Work stockinette stitch for 3.5 cm from cast on edge, ending with the WS row. Row 1 (RS)- work lateral braid as mentioned above (see tutorial) Row 2 (WS)- purl all sts Work stockinette stitch for 3.5 cm from lateral braid. BO all the sts.
FINISHING
Fold the knitted piece in half at lateral braid row and sew the scrunchie keeping the elastic band inside.
PATTERN SUPPORT
For any queries with the pattern, please email our designer at knittinglibrary4@gmail.com, or you can DM her on Instagram @knitting_library.
We would love to see your version of “Birthday Scrunchies” – Share your version on Instagram with #birthdayscrunchiesbynik #iycbirthdayscrunhiekal #iyckal and tag @indiayarn.circle and @knitting_library.
Please feel free to leave your comments and suggestions below!!